3. Storage services
- In Block storage, data is stored in blocks on disks and multiple blocks comprise a file. It has no native metadata and is designed for achieving high performance. It requires that the operating system has direct byte-level access to a storage device. A block device is a storage device that moves data in sequences of bytes or bits. Amazon EBS provides durable, block-level storage volumens that you can attacj to a running Amazon Ec2 instance.
- In File storage, data is stored on a file system. It requires the network file system (NFS) protocol to abstract the operating system from storage devices. Data stored in a file system contains attributes such as permissions, file owner and they are stored as metadata in the file system. You can use an Elastic File System (EFS) file system as a common data source for workloads and applications running on multiple instances.
- Object storage. It is a flat system which stores data as objects which encapsulates the attributes, metadata, and other properties. It stores the data, data attributes, metadata, and object IDs as objects. It provides API access to data. It is metadata driven, policy-based, etc. It allows you to store limitless amount of data and scales easily. Content type, permissions and the file owner are stored as metadata in a file system. There are more metadata that can be stored as object. You can create custom metadata named values that can be used for such things as analytics. Amazon S3 is designed to make web-scale computing easier by enabling you to store and retrieve any amount of data, at any time, from within Amazon EC2 or anywhere on the web.
Each storage option has a unique combination of performance, durability, cost and interface. Your applications and workloads will help you determine which type of storage you will need for your implementation.
3.1. Amazon S3
3.1.1. Amazon S3 Overview
Introduction to Amazon Simple Storage Service (S3)
It is intentionally built with a minimum feature set focusing on simplicity and robutness: It is a highly durable, highly available, high performant object storage service. It provides you an easy-to-use, scalable object storage service that is payable as you go and integrates with other AWS services and 3rd party solutions. Main characteristics:
You pay for what you use. You don’t need to preprovision the size of your Amazon S3 for your data.
It is designed for 11 nines of durability.
It is performant system that is highly scalable.
It has different storage classes and transitions targets:
- S3 Standard.
- S3 Standard - Infrequent Access.
- S3 One Zone - Infrequent Access.
- and the possibility to automatically transition data to Amazon Glacier.
Amazon S3 stores the data as objects within buckets. An object consists of data and optionally any metadata that describes that file.
3.1.1.1. Object Storage Classes
Consider the type of data, the resiliency requirements and usage pattern in order to decide which object storage class is best suited to your needs. The typical lifecycle of data is the newer it is, the more frequently it is consumed. Amazon S3 offers a range of storage classes designed for different use cases. These include:
The first and default option is Amazon S3 Standard designed for the active data or hot workloads, it provides milliseconds access and has the highest cost of the 3 classes. If you don’t know what your access patterns are or you need frequent retrieval, start with S3 Standard. Some common use cases are Big Data analysis, Content distribution and Web site hosting.
The S3 Intelligent-Tiering storage class is designed to optimize costs by automatically moving data to the most cost-effective access tier, without performance impact or operational overhead.
S3 Intelligent-Tiering works by storing objects in 2 access tiers: one tier that is optimized for frequent access and another lower-cost tier that is optimized for infrequent access. For a small monthly monitoring and automation fee per object, Amazon S3 monitors access patterns of the objects in S3 Intelligent-Tiering and move the ones that have not been accessed for 30 consecutive days to the infrequent access tier.
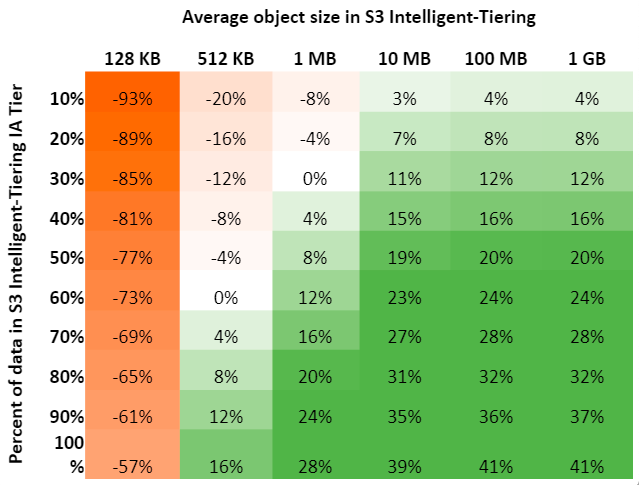
The S3 Intelligent-Tiering charges a per object monitoring fee to monitor and place an object in the optimal access tier. As a result, on a relative basis, the object fee is less when the objects are larger and thus the amount you can save is potentially higher. In the following image, you can see an example of the potential cost savings for objects stored in S3 Standard versus S3 Intelligent-Tiering. For these calculations, we assumed 10 PB of data, in US-East-1 AWS Region, and a minimum object size of 128 KB.
As your data ages and it’s accessed less, you can use Amazon S3 Standard - IA. It is designed for colder or less frequently accessed data that requires milliseconds access. For example, you can leverage the Standard IA class to store detailed application logs that you analyze infrequently. It provides the same performance, throughput and low latency as the Standard storage class. It is lower in storage costs but along with storage costs, there is a retrieval cost associated with object access higher than with Amazon S3 Standard. Some common use cases are backup storage, DR, data that doesn’t change frequently.
Amazon S3 One Zone - IA is ideal for customers who want a lower-cost option for infrequently accessed data, require similar milliseconds access but don’t require the same durability and resiliency as the previous classes. It costs less than the previous classes as it stores data in only 1 AZ. It has the same associated retrieval cost as Amazon S3 Standard - IA. It is a good choice for example for storing secondary backup copies of on-premises data, or easily recreated data, or storage use of Amazon S3 Cross Region replication target from another AWS S3 Region.
Amazon Glacier and Amazon S3 Glacier Deep Archive are suitable for archiving data where data access in frequent. Archive data is not available for real-time access. You must restore the objects before you can access them. It is storage service designed for long-term archival storage and asynchronous retrieval from minutes to hours. For example you can leverage Amazon Glacier for storing long-term backup archives. The cost of storage for Amazon Glacier is less than the other storage classes and has also an additional cost for data retrieval. There are 3 retrieval options ranging in time from minutes to hours.
Coming Soon - S3 Glacier Deep Archive for Long-Term Data Retention
S3 Standard, S3 Standard-IA and Glacier replicates its data across at least to 3 different AZs within a single region. If you do not need this resiliency, S3 One Zone-IA is stored in 1 AZ. If this AZ is destroyed, you will lose your data.

Comparing Object Storage Classes
3.1.2. Using Amazon S3
3.1.2.1. Buckets
Amazon S3 uses buckets to store your data. Before you can transfer data into Amazon S3, you must first create a bucket. The data that is transfer is stored as objects in the bucket. When creating bucket you don’t pre-determine size, apy for what you use.
One factor that you must consider when creating a bucket is the region where the bucket will be created. Wherever region the bucket is created in is where your data resides. You consider the location to optimize latency, minimize cost and comply with regulations.
Data in Amazon S3 do not expands regions automatically, although you can replicate your bucket to other regions if needed. This feature is called Cross-Region replication.
When you create a bucket, the bucket is owned by the AWS account that created it and the bucket ownership is not transferable. There is no limit in the number of object that can be stored in a bucket. There is no difference in performance whether you use many or just a few. You can store all of your objects in a single bucket or you can organize them across several buckets. You cannot create a bucket within another bucket. By default, you can create 100 buckets under each of your AWS accounts. If you need additional buckets, you can increase your bucket limit by submitting a service limit increase.
When naming your bucket, there are some rules you need to follow: the name of your bucket must globally unique and to be DNS-compliant. Be aware of uppercase letters in your bucket name, all names should be lowercase. The rules for DNS-compliant names are:
- Bucket names must be 3 and 63 characters long.
- Bucket names can contain lowercase letters, numbers, and hyphens. Each label must start and end with a lowercase letter or a number.
- Bucket names must not be formatted as an IP address.
- It is recommended that you do not use periods in bucket names.
3.1.2.2. Objects
The file and metadata that you upload or create are essentially containerized in an object. Knowning the parts that make up an object is useful when you need to find accessed object in your bucket or when you create policies to secure your data.
If we have an object called mybucket/mydocs/mydocument.doc. The key is the name we assigned to an object, in this example: mydocs/mydocument.doc. You will use the object key to retrieve the object. Although you can use any UTF-8 characters in an object name, using the key naming best practices helps ensure maximum compatibility with other applications. The following object key name guideliens will helps you compliance with DNS, website characters, XML parsers and other APIs:
If you utilize any other characters in key names, they may require special handling.
The parts that makes up an object are:
Version ID uniquely identify an object. It is the string that AWS generates when you add an object to a bucket. This is utilized when versioning is enabled on your bucket.
Value is the content that you are storing. It can be any sequence of bytes. Objects size can be 0-5 TB.
Metadata is a set of name/value pairs where you can store information regarding the object. Your applications and data analysis may take advantage of your metadata to identify an classify your data. There are 2 kinds of metadata:
- System-defined metadata. For every object stored in a bucket, Amazon S3 maintains a set of system metadata of the objects for managing them. For example: creation time and date, size, content type, storage class. Some system metadata can be modified, for more details go to Object Key and Metadata
- User-defined metadata. You provide this optional information as a name-value pair when you send the request to create an object or update the value when you need. User-defined metadata requires a special prefix:
x-amz-meta-when uploadin via the REST API, otherwise S3 will not set the key-value pair as user-defined. You can only set the value of the metadata at the time when you upload it. After you uploaded the object, you cannot modify existing metadata. The only way to modify existing object metadata is to make a copy of the object and set the new metadata value. There is one exception to this: the use of object tags. Object tags are another for of metadata that help with the organization of the data that can be changed at any time.
Access control information. You can control access to the objects stored in Amazon S3. It supports resource access control such as ACLs, bucket policies, and User-based access control.
Another important aspect about objects is that objects are not partially updated. When you make a change to an object or upload a new copy into the bucket which does not have versioning enabled, a new object is created an overwrites the existing object. If you have versioning enabled in your bucket an upload a new copy, a new version of the object is created.
Amazon S3 is a distributed system. If it receives multiple write requests for the same object simultaneously, it overwrites all but the last object written.
Amazon S3 didn’t provide object locking but now it does: Locking Objects Using Amazon S3 Object Lock.
3.1.2.3. Accessing your data
There multiple ways in which you can make your requests to retrieve or add data to your Amazon S3 bucket:
- You can view, upload and download objects through the AWS Console. For large amounts of data this is not the best way to transfer or access the data. The maximum size of a file that you can upload using the console is 78 GB.
- Via AWS CLI.
- Via AWS SDK.
Amazon S3 supports 2 types of URLs to access objects:
- Path-style URL. Structure:
http://<region-specific endpoint>/<bucket name>/<object name>
Example:
http://s3-eu-west-1.amazonaws.com/mybucket/sensordata.html
- Virtual-hosted-style. Structure:
http://<bucketname>.s3.amazonaws.com/<object key>
Example:
http://mybucket.s3.amazonaws.com/sensordata.html
It is recommended to use Virtual-hosted-style URLs. It is useful if you are using your S3 bucket to host a static website. You can also publish to the root directory of your bucket virtual server. This ability can be important since many existing applications search for files in this standard location.
You should be aware that when accessing your with HTTP-based URL, if your name your bucket to match your registered domain name such as www.example.com and set that DNS name as a CNAME alias for www.example.com.s3.amazonaws.com you can access objects with a customized URL such as:
http://www.example.com/sensordata.html
When accessing your bucket with a HTTP-based URL, if your bucket has a period in your bucket name it can cause certificate exceptions when accessed. To support HTTP access to your bucket, you should avoid using a period in the bucket name.
3.1.2.4. How a request is routed
In AWS, S3 does not provide any query facility. To retrieve a specific object the user needs to know the exact bucket / object key. In this case, it is recommended to have an own DB system which manages the S3 metadata and key mapping.
S3 uses DNS to route requests to facilities that can process them. This system works very effectively. However, temporary routing errors can occur. If a request arrives at the wrong Amazon S3 region, S3 responds with a temporary redirect that tells the requester to resend the request to the correct region. If a request is incorrectly formed, S3 uses permanent redirects to provide direction on how to perform the request correctly and S3 will respond with a 400 error.
In the following diagram are the steps of how the DNS request process occurs:
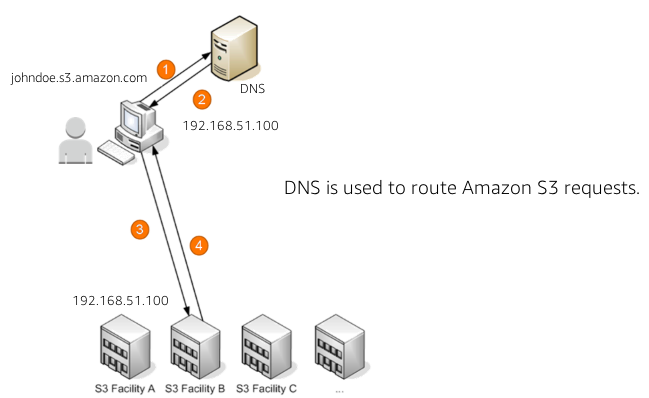
How a request is routed
- The client makes a DNS request to get an object stored on S3.
- The client receives one or more IP addresses for facilites that can process the request.
- The client makes a request to S3 regional endpoint.
- S3 return a copy of the object.
3.1.2.5. Operations on Objects
3.1.2.5.1. PUT
In order to get an object into a bucket, you will use the PUT operation. You can upload or copy objects of up tp 5 GB in a single PUT operation. For larger objects up to 5 TB, you must use the multipart upload API.
If you triggered an S3 API call and got HTTP 200 result code and MD5 checksum, then it is considered as a successful upload. The S3 API will return an error code in case the upload is unsuccessful.
Multipart upload allows you to upload a single object as a set of parts. You can upload each part separately. If one of the parts fails to upload, you can retransmit that particular part without retransmitting the remaining parts. After all the parts of your object are uploaded to the server, you must send a complete multipart upload request that indicates that multipart upload has been completed. S3 then assembles these parts and creates the complete object. You should consider using multipart upload for objects larger than 100 MB. With multipart uploads you can upload parts in parallel to improve throughput, recover quickly from network issues, pause and resume object uploads, and begin an upload before you know the final size of an object.
You can also abort a mulitpart upload. When you abort an upload, S3 deletes all the parts that were already uploaded and frees up storage. S3 retains all parts on the server until you complete or abort the upload. Make sure to complete or abort an upload to avoid unnecessary storage costs related to incomplete uploads. You can also take advantage of lifecyle rules to clean up incomplete multipart uploads automatically. As a best practice, it is recommended to enable the Clean up incomplete multipart uploads in the lifecycle settings even if you are not sure that you are actually making use of multipart uploads. Some applications will default to the use of multipart uploads when uploading files avove a particular, application-dependent, size.
3.1.2.5.2. COPY
Once your objects are in the bucket you can use the COPY operation to create copies of an object, rename an object, move it to a different S3 location, or to update its metadata.
3.1.2.5.3. GET
Using a GET request you can retrieve a complete object from your bucket. You can also retrieve an object in parts using ranged GETs, by specifying the range of bytes needed. This is useful in scenarios where network connectivity is poor or your application can or must process only subsets of object data.
3.1.2.5.4. DELETE
You can delete a single object or delete multiple objects in single delete request. There are 2 things that can occur when you issue a DELETE request, depending if versioning is enabled or disabled on your bucket.
In a bucket that is not versioning-enabled, you can permanently delete an object by specifying the key that you want to delete. Issuing the delete request permanently removes the object and it is not recoverable, there is no recycle bin type feature in buckets when versioning is disabled.
In a bucket that is versioning-enabled, you can permanently delete an object or a delete marker is created by S3 and the object, depending on how the delete request is made:
- If you specify a key only with the delete request, S3 adds a delete market which becomes the current version of the object. If you try to retrieve an object that has a delete marker, S3 returns a 404 Not Found error. You can recover the object by removing the delete marker from the current version of the object and it will then become available againg for retrieval.
- You can also permanently delete individual versions of an object, by invoking a delete request with a key and the version ID. To completely remove the object from your bucket, you must delete each individual version.
3.1.2.5.5. List Keys
With object storage such as S3, there is no hierarchy of objects stored in buckets, it is a flat storage system. In order to organize your data you can use prefixes in key names to group similar items. You can use delimiters (any string such as / or _) in key names to organize your keys and create a logical hierarchy. If you use prefixes and delimiters to organize keys in a bucket, you can retrieve subsets of keys that match certain criteria. You can list keys by prefix. You can also retrieve a set of common key prefixes by specifying a delimeter. This implementation of the GET operation returns some or all (up to 1000) of the objects in a bucket.
In the following example, the bucket named scores contains objects with English and Maths scores of students for the year 2017.
aws s3api list-objects --bucket scores --query "Contents[].{Key: Key}"

2017/score/english/john.txt
2017/score/english/sam.txt
2017/score/maths/john.txt
2017/score/maths/sam.txt
2017/score/summary.txt
overallsummary.txt
To list keys related to the year 2017 in our scores bucket, specify the prefix of 2017/.
aws s3api list-objects --bucket scores --prefix 2017/ --query "Contents[].{Key: Key}"

2017/score/english/john.txt
2017/score/english/sam.txt
2017/score/maths/john.txt
2017/score/maths/sam.txt
2017/score/summary.txt
To retrieve the key for the 2017 scores summary in the scores bucket, specify a prefix of 2017/score/ and delimiter of /. The key 2017/score/summary.txt is returned because it contains the prefix 2017/score/ and does not contain the delimiter / after the prefix.
aws s3api list-objects --bucket scores --prefix 2017/score/ --delimiter / --query "Contents[].{Key: Key}"

2017/score/summary.txt
To find subjects for which scores are available in our bucket, list the keys by specifying the prefix of 2017/score/` and delimiter of / and then you will get a response with the common prefixes.
aws s3api list-objects --bucket scores --prefix 2017/score/ --delimiter /

COMMONPREFIXES 2017/score/english/
COMMONPREFIXES 2017/score/maths/
2017/score/summary.txt
3.1.2.6. Restricting object access with pre-signed URL
In Amazon S3, all objects are private by default. Only the object owner has permission to access these objects. However, the object owner can optionally share objects with others by creating a pre-signed URL, using their own security credentials, to grant time-limited permission to download the objects.
Pre-signed URLs are useful if you want your user to be able to upload a specific object to your bucket without being required to have AWS security credentials or permissions. When you create a pre-signed URL, you must provide your security credentials, bucket name, an object key, an HTTP method (PUT for uploading objects, GET for retreiving objects), and an expiration date and time. The pre-signed URLs are valid only for the specified duration.
Share the pre-signed URL with users who need to access your S3 bucket to put or retrieve objects. Anyone who receives the pre-signed URL can then access the object. For example, if you have a video in your bucket and both the bucket and the object are private, you can share the video with others by generating a pre-signed URL.

Pre-signed URL
3.1.2.7. Cross-Origin Resource Sharing
Cross-Origin Resource Sharing (CORS) defines a way for client web application that are loaded in one domain to interact with resources in a different domain. Consider the following examples:
- You want to host a web font in your S3 bucket. A web page in a different domain may try to use this web font. Before the browser loads this web page, it will perform a CORS check to make sure that the domain from which the page is being loaded is allowed to access resources from your S3 bucket.
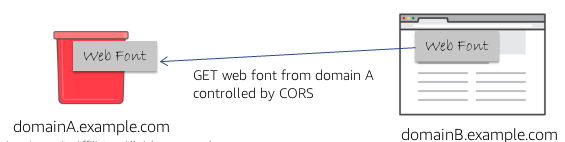
CORS use case example
- Javascript in one domain’s web pages (http://www.example.com) wants to use resources from your S3 bucket by using the endpoint
website.s3.amazonaws.com. The browser will allow such cross-domain access only if CORS is enabled on your bucket.
With CORS support in S3, you can build web applications with S3 and selectively allow cross-origin access to your S3 resources.
To enable CORS, create a CORS configuration XML file with rules that identify the origins that you will allow to access your bucket, the operations (HTTP methods) that you will support for each origin, and other operation-specific information. You can add up to 100 ules to the configuration. You can apply the CORS configuration to the S3 bucket by using the AWS SDK.
3.1.2.8. Managing access
3.1.2.8.1. Access policies
By default, all S3 resources (buckets, objects, and related sub-resources) are private, only the resource owner, and AWS account that created it, can access the resource. The resource owner can optionally grant access permissions to others by writing and access policy. By default, any permission that is not granted Allow access is an implicit Deny. There are 2 types of access policies: resource-based and IAM policies.
- IAM policies are assigned to IAM users, groups, or roles. They provide fine grained control over access and can be administered as part of a role based access configuration. These type of policies are applied at the IAM role, user, and group level to control access to S3 and its resources. It answer the question What can this user do in AWS?, not only in S3.
{
    "Version": "2012-10-17",
    "Statement": [
        {
            "Action": [
                "s3:GetObject",
                "s3:ListBucket"
            ],
            "Effect": "Allow",
            "Resource": "arn:aws:s3:::<bucket_name>/<key_name>",
        }
    ]
}
- Access policies which are attached to your resources (buckets and objects) are referred to as resource-based policies. For example: bucket policies and ACLs are resource-based policies. Bucket policies are very similar to IAM policies, but he major difference is you need to define a Principal in the policy and it is embedded in a bucket in S3 versus created in AWS IAM and assigned to a user, group or role. Amazon S3 Bucket policies answer the question Who can access this S3 bycket? You can also grant cross account access using bucket policies without having to create IAM roles. You may find that your IAM policies bump up against the size limit (up to 2 kb for users, 5 kb for groups, and 10 kb for roles), and you can then use bucket policies instead. Amazon supports bucket policies of up to 20 kb. Another reason you may want to use bucket policies it that you may just want to keep access policies within Amazon S3 rather than using IAM policies cerated in the IAM console.
{
    "Version": "2012-10-17",
    "Statement": [
        {
            "Action": [
                "s3:GetObject",
                "s3:ListBucket"
            ],
            "Effect": "Allow",
            "Resource": "arn:aws:s3:::MYEXAMPLEBUCKET",
            "Principal": {
                "AWS": [
                        "arn:aws:iam::123456789012:user/testuser"
                ]
            }
        }
    ]
}
You may choose to use resource-based policies, user policies, or some combination of these to manage permissions to your S3 resources. Both bucket policies and user policies are written in JSON format and not easily distinguishable by looking at the policy itself, but by looking at what the policy is attached to, it should help you figure out which type of policy it is. The AWS Policy Generator is a tool that enables you to create policies that control access to AWS products and resources.
Additionally, when trying to understand if the application of your policies will work as expected, AWS has a Policy Simulator you can use to determine if your policies will work as expected.
How do I configure an S3 bucket policy to Deny all actions unless they meet certain conditions?
3.1.2.8.2. Access Control Lists
As a general rule, it is recommended to use S3 bucket policies or IAM policies for access control. Amazon S3 ACLs is a legacy access control mechanism that predates IAM. A S3 ACL is a sub-resource that’s attached to every S3 bucket and object. If defines which AWS accounts or groups are granted access and the type of access. When you create a bucket or an object, Amazon S3 creates a default ACLs that grants the resource owner full control over the resource. ACLs are much more limited in the fact that you can only use ACLs to grant access to other AWS accounts and not IAM users in the same account where the bucket resides.

ACL expanded view
Be very careful to ensure you do not enable public access unless it is required. If you do have a publicly accessible bucket, the S3 console displays a prominent indicator with a warning showing that Everyone means everyone on the Internet.
S3 has a set of predefined groups that can be used to grant access using ACLs. It is recommended that you do not use the Authenticated Users and All Users in ACLs when granting access permissions to your bucket unless you are sure you want to open your bucket to being publicly accessible.
- Authenticated Users group represents all AWS accounts in the world, not just yours. Utilizing this group to grant access could allow any AWS authenticated user in the world access to your data.
- All users group is similar to the Authenticated Users group in that it is not limited to just your AWS account. The requess can be signed (authneticated) or unsigned (anonymous). Unsigned requests omit the Authentication header in the request. It is highly recommended that you never grant the All Users group
WRITE,WRITE_ACP, orFULL_CONTROLpermissions. For example,WRITEpermissions allow anyone to store objects in your bucket, for which you are billed. It also allows others to delete objects that you might want to keep. - Log delivery group. When granted
WRITEpermission to your bucket, it enables the S3 log delivery group to write server access logs.
Amazon S3 Block Public Access – Another Layer of Protection for Your Accounts and Buckets
3.1.2.9. Data Transfer
You may need a variety of tools to move or transfer data in and out the cloud, depending on your data size and time to transfer. These are the options:
- AWS Direct Connect is a dedicated network connection from your on-premises data center to AWS for higher throughput an secure data transfer without traversing Internet.
- AWS Storage Gateway, either with or without AWS Direct Connect. This is a virtual appliance that lets you connect to your bucket as an NFS mount point.
- Third-party connectors (ISV connectors). Amazon partners can help you move your data to the cloud. The simplest way to do that may be via a connector embedded in your backup software. With this approach, your backup catalog stays consistent, so you maintain visibility and control across jobs that span disk, tape and cloud.
- You can stream data into S3 via Amazon Kinesis Firehose, a fully managed streaming service. Because it captures and automatically loads streaming data into S3 and Amazon Redshift, you get near real-time analytics with the business intelligence tools you’re already using.
- Amazon Kinesis Video Streams makes it easy to securely stream video from connected devices to AWS for analytics, machine learning, and other processing. Kinesis Video Streams automatically provisions and elastically scales all the infrastructure needed to ingest streaming video data from millions of devices. Kinesis Video Streams uses S3 as the underlying data store, which means your data is stored durably and reliably. You can set and control retention periods for data stored in your streams.
- Amazon Kinesis Data Streams enables you to build custom applications that process or analyze streaming data for specialized needs. Kinesis Data Streams can continously capture and store TBs of data per hour from hundreds of thousands of sources such as website clickstreams, financial transactions, social media feeds, IT logs, and location-tracking events. You can also emit data from Kinesis Data Streams to other AWS services such as S3, Amazon Redshift, EMR, AWS Lambda.
- Amazon S3 Transfer Acceleration is used for fast, easy, and secure transfers of files over long distances. It takes advantage of CloudFront’s globally distributed edge locations, routing data to S3 over an optimized network path. Transfer Acceleration works well for customers who either transfer data to a central location from all over the world, or who transfer significant amounts of data across continents regularly. It can also help yu better utilize your available bandwidth when uploading to S3.
- For large data migrations where transferring over a network would be too time consuming or costly, use AWS Snowball, Snowball Edge or Snowmobile. These are for petabyte-scale and exabyte-scale data transport that use secure appliances to transfer large amounts of data into and out of AWS.
Using AWS Snowball Edge and AWS DMS for Database Migration
Bear in mind that you can also use these methods for exporting your data. Cloud Data Migration.
c:\mydata> aws s3 mb s3://myappbucket6353 --region us-east-1
make_bucket: myappbucket6353

c:\mydata> aws s3 ls
2013-07-11 17:08:50 mybucket
2013-07-24 14:55:44 myappbucket6353

c:\mydata> aws s3 cp c:\mydata s3://myappbucket6353 --recursive
upload: myDir/test1.txt to s3://myappbucket635/myDir/test1.txt
upload: myDir/test2.txt to s3://myappbucket635/myDir/test1.txt
upload: test3.txt to s3://myappbucket635/test3.txt

c:\mydata> aws s3 ls s3://myappbucket6353
                           PRE myDir/
2013-07-25 17:06:27         88 test3.txt
3.1.2.10. Amazon S3 Select
S3 Select is a new S3 capability designed to pull out only the data you need from an object using a SQL expression, dramatically improving the performance and reducing the cost of applications that need to access data in S3. Most applications have to retrieve the entire objetct and then filter ut only the required data for further analysis. S3 Select enables applications to offload the heavy lifting of filtering and accessing data inside objects to the S3 service. By reducing the volume of daa that has to be loaded and processed by your applications, S3 Select can improve the performance of most applications that frequently access data from S3 by up to 400%.
Amazon S3 Select works like a GET request as it is an API call. But where Amazon S3 Select is different is we are asking for data within an object that matches a set of criteria, rather than just asking to get an entire object. You can use Amazon S3 Select through the available Presto connector, with AWS Lambda, or from any other application using the S3 Select SDK for Java or Python. In the query, you use an standard SQL expression.
Amazon S3 Select works on objects stored in delimited test (CSV, TSV) or JSON format. It also works with objects that are compressed with GZIP, and server-side encrypted objects. You can specify the format of the results as either delimited test (CSV, TSV) or JSON, and you can determine how the records in the result will be delimited. To retreive the information you need, you pass SQL expressions to S3 in the request. Amazon S3 Select supports a subset of SQL as listed in bale below.
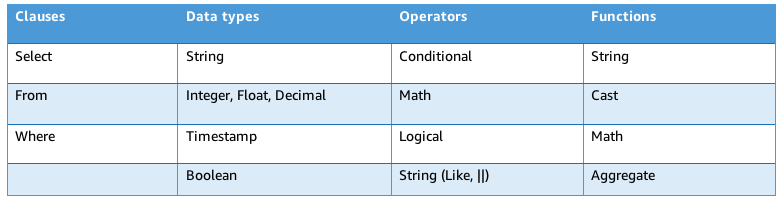
SQL queries with Amazon S3 Select
Selecting Content from Objects
There are a few ways you can use Amazon S3 Select. You can perform SQL queries using AWS SDKs, the SELECT Object Content REST API, the AWS CLI, or the Amazon S3 console. When using the Amazon S3 console, it limits the amount of data returned to 40 MB.
3.1.3. Securing your data in Amazon S3
AWS re:Invent 2018: [Repeat] Deep Dive on Amazon S3 Security and Management (STG303-R1)
In the decision process for determining access to your bucket and objects, S3 starts with a default deny to everyone. When you create a bucket, the owner is granted access, and as the owner you can then allow access to other users, groups, roles and resources. When determining the authorization of access to your resource in S3, it is always a union of user policies, resource policies and ACLs. In accordance with the principle of least-privilege decisions default to DENY, and an explicit DENY always trumps an ALLOW.
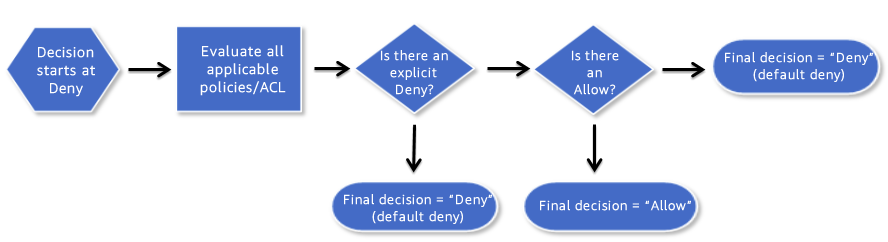
Access decision process
For example, assume there is an IAM policy that grants a user access to a bucket. Additionally, there is a bucket policy defined with an explicit DENY for the user to the same bucket. When the user tries to access the bucket, the access is denied.
Keep in mind that if no policy or ACLs specifically grants ALLOW access to a resource the entity will be denied access by default. Only if no policy or ACLs specifies a DENY an one or more policies or ACLs specify an ALLOW will be the request be allowed.
3.1.3.1. Policies
A policy is an entity in AWS that, when attached to an identity or resource, defines the permissions. AWS evaluates these policies when a principal, such as a user, makes a request. Permissions in the policies determine whether the request is allowed or denied. Policies are stored in AWS as JSON documents attaches to principals as identity-based policies, or to resources as resource-based policies.
The language elements that are used in a policy are the following:
- Resources. The Resource element specifies the buckets or objects that the statement covers. Buckets and objects are the S3 resources for which you can allow or deny permissions. In a policy, you use the Amazon Resource Name (ARN) to identify the resource. For example, your resource could be just the bucket or it could be a bucket and objects, a bucket and subset of objects or even a specific object.
- Actions. For each resource, S3 support a set of operations. You identify resource operations you want to allow or deny by using action keywords. You specify a value using a namespace that identifies the service, for example s3, followed by the name of the action. The name must match an action that is supported by the service. The prefix and the action name are case insensitive. You can use wilcards * to allow all operations for a service.
- Effect. This is what the effect will be when the user requests the specific action, this can be either allow or deny. If you do not explicitly grant allow access to a resource, access in implcitly denied. You can also explicitly deny access to a resource, which you might do in order to make sure that a user cannot access it, even if a different policy grants access. For example, you may want to explicitly deny the ability to delete objects in a bucket.
- Principal. Use the pricipal element to specify the user (IAM user, federated user, or assumed-role user), AWS account, AWS service, or other principal entity that is allowed or denied access to a resource. You specify a principal only in a resource policy, for example a bucket policy. It is the user, account, role, service, or other entity who is the recipient of this permission. When using an IAM policy, the user, group or role to which the policy is attached is the implicit principal.
- Conditions. You can optionally add a Condition element (or Condition block) to specify conditions for when a policy is in effect. In the Condition element, you build expressions in which you can use condition operators (equal, less than, etc.) to match the condition in the policy against values in the request. Condition values can include date, time, the IP address of the requester, the ARN of the request source, the user name, user ID, and the user agent of the requester. Some services let you specify additional values in conditions; for examples S3 lets you write condition suing items such as object tags (s3:RequestObjectTag) to grant or deny the appropriate permission to a set of objects.
Example IAM Identity-Based Policies
There are some additional elements that can be used in policies: NotPrincipal, NotAction, and NotResource.
You can use the NotPrincipal element to specify and exception to a list of principals. For example, you can deny access to all principals except the one named in the NotPrincipal element.
Although you can use the NotPrincipal with an Allow, when you use NotPrincipal in the same policy statement as “Effect”:”Allow”, the permissions specified in the policy statment will be granted to all principals excepts the one(s) specified, including anonymous (unauthenticated) users. It is recommended not yo use NotPrincipal in the same policy statement as “Effect”:”Allow”.
When creating a policy, combining “Deny” and “NotPrincipal” is the only time that the order in which AWS evaluated principals makes a difference. AWS internally validates the principals from the “top down”, meaning that AWS checks the account first and then the user. If an assumed-role user (someone who is using a role rather than an IAM user) is being evaluated, AWS looks ata the account first, then the role, and finally the assumed-role user. The assumed-role user is identified by the role session name that is specified when the user assumes the role. Normally, this order does not have any impact on the results of the policy evaluation. However, when you use both “Deny” and “NotPrincipal”, the evaluation order requires you to explicitly include the ARNs for the entities associated with the specified principal. For example, to specify a user, you must explicitly include the ARN for the user’s account. To specify an assumed-role user, you must also include both the ARN for the role and the ARN for the account containing the role.
NotAction is an advanced policy element that explicitly matches everything except the expecified list of actions and it can be used with both the Allow and Deny effect. Using NotAction can result in a shorter polciy by listing only a few actions that should not match, rather then including a long list of actions that will match. When using NotAction, you should keep in mind that actions specified in this element are the only actions that are limited. This means that all of the actions or services that are not listed, are allowed if you use the Allow effect, or are denied if you use the Deny effect.
You can use the NotAction element in a statement with “Effect”:”Allow” to provide access to all of the actions in an AWS service, except for the actions specified in NotAction. You can also use it with the Resource element to provide access to one or more resources with the exception of the action specified in the NotAction element.
Be careful using the NotAction and “Effect”:”Allow” in the same statement or in a different statement within a policy. NotAction matches all services and actions that are not explicitly listed, and could result in granting users more permissions that you intended.
You can also use the NotAction element in a statement with “Effect”:”Deny” to deny access to all of the listed resources except for the actions specified in the NotAction element. This combination does not allow the listed items, but instead explicitly denies the actions not listed. You must still allos actions that you want to allow.
NotResource is an advanced policy element that explicitly matches everything except the specified list of resources. Using NotResource can result in a shorter policy by listing only a few resources that should not match, rather thatn including a long list of resources that will match. When using NotResource, you should keepn in mind that resources specified in this element are the only resources that are limited. This, in turn, means that all of the resources, including the resources in all other services, that are not listed, are allowed if you use the Allow efffect, or are denied if you use the Deny effect. Statements must include either the Resource or a NotResource element that specifies a resource using an ARN.
Be careful using the NotResource and “Effect”:”Allow” in the same statement or in a different statement within a policy. NotResource allows all services and resources that are not explicitly listed, and could result in granting users more permissions that you intended. Using the NotResource element and “Effect”:”Deny” in the same statement denies services ans resources that are not explicitly listed.
Normally, to explicitly deny access to a resource you would write a policy that uses “Effect”:”Deny” and that includes a Resource element that lists each folder individually.
3.1.3.1.1. Cross account policies
One option you can use is to ensure that account that created the object adds the grant that gives the bucket-owner-full-control permission on the object so the bucjet owner can set permissions as needed. You can do this by adding a condition in the policy. Additionally, you can deny the ability to upload objects unless that account grants bucket-owner-full-control permissions.
In the example below, when Jane uploads an object to the images bucket, she includes the grant bucket-owner-full-control permission. If she did not include this grant, the upload would fail. Noew when Joe tries to GET the new object uploaded by Jane with the additional permisssions, he is successful.
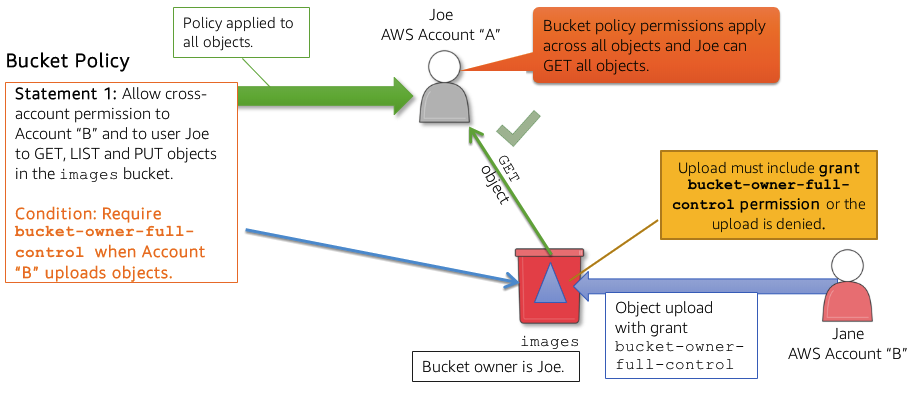
Access decision process
3.1.3.1.2. Multiple policies
You can attach more than 1 policy to an entity. If you have multiple permissions to grant to an entity, you can put them in separate policies, or your can put them all in one policy. Generally, each statement in a policy includes information about a single permission. If your policy includes multiple statements, a logical OR is applied across the statements at evaluation time. Similarly, if multiple policies are applicable to a request, a logical OR is applied across the policies at evaluation time.
Users often have multiple policies that apply to them (but aren’t necessarily attached to them). For example, an IAM user could have policies attached to them, and other policies attached to the groups of which they are a member. In addition, they might be accessing an S3 bucket that has its own bucket policy (resource-based policy). All applicable policies are evaluated and the result is always that access is either granted or denied.
3.1.3.2. Best practices
Some best practices to use in securing your S3 data to follow in your setup are the following:
Use bucket policies to restrict deletes.
For additional security, enable MFA delete, which requires additional authentication to:
- Change the versioning state of your bucket.
- Permanently delete an object version.
Note that to enable MFA delete with Amazon S3 you will need root credentials. When using MFA you will require an approved AWS authentication device.
3.1.3.3. Data at rest encryption
For data at rest protection in S3 you have 2 options: Server-Side Encryption and Client-Side Encryption.
3.1.3.3.1. Server-Side Encryption
When using server-side encryption, your request S3 to encrypt your object saving it on disks in its data centers and decrypt it when you download the object. With server side encryption there are a few ways in which you can choose to implement the encryption. You have 3 server-side encryption options for your S3 objects:
- Amazon S3-Managed Keys (SSE-S3). This method uses keys that are managed by S3. Each object is encrypted with a unique key. Additionally a master key, which is rotated regularly, encrypts each unique key. This method uses AES-256 algorithm to encrypt your data. This option can also be used when setting the default encryption option.
- AWS KMS-Managed keys (SSE-KMS) is similar to SSE-S3, but with some additional benefits along with some additional charges for using service. SSE-KMS encrypts only the object data, any object metadata is not encrypted. In this model, the AWS Key Management Service (AWS KMS) is utilized to fully manage the keys and encryption and decryption. AWS KMS encrypts your objects similar to the way SSE-S3 does. There is a unique per-object data key, which is encrypted with customer master keys (CMK) in KMS. This scheme is called envelop encryption. You use AWS KMS via the Encryption Keys section in the IAM console or via AWS KMS APIs to centrally create encryption keys, define the policies that control how keys can be used, and audit key usage to prove they are being used correctly. The first time you add an SSE-KMS-encrypted object to a bucket in a region, a default CMK is created for you automatically. This key is used for SSE-KMS-encryption unless you select a CMK that you created separately using AWS KMS. Creating your own CMK gives you more flexibility, including the ability to create, rotate, disable, and define access controls, and to audit the encryption keys used to protect your data. Using SSE-KMS also adds a layer of security in that any user that attempts to access an object that is SSE-KMS encrypted will also require access to the KMS key to decrypt the object. You can configure access to the KMS encryption keys using AWS IAM. This option can also be used when setting the default encryption option.

SSE-KMS
You should be aware that when using AWS KMS there some limits on requests per second. AWS KMS throttles API requests at different limits depending on the API operation. Throttling means that AWS KMS rejects an otherwise valid request because the request exceeeds the limit for the number of requests per second, AWS KMS Limits. When a request is throttled, AWS KMS returns a ThrottlingException error.
A customer master key (CMK) is a logical representation of a master key. The CMK includes metadata, such as the key ID, creation date, description, and key state. The CMK also contains the key material used to encrypt and decrypt data. You can use a CMK to encrypt and decrypt up to 4 KB (4096 bytes) of data. Typically, you use CMKs to generate, encrypt, and decrypt the data keys that you use outside of AWS KMS to encrypt your data.
- Customer provided keys (SSE-C). In this model, you manage the encryption keys and S3 manages the encryption, as it writes to disks, and decryption, when you access your objects. Therefore, you don’t need to maintain any code to perform data encryption and decryption. The only thing you do is manage the encryption keys you provide. When you upload and object, S3 uses the encryption key you provide to apply AES-256 encryption to your data and then removes the encryption key from memory. When you retrieve an object, you must provide the same encryption key as part of your request, S3 first werifies that the encryption key you provided matches, and then decrypts the object before returning the object data to you.
It is important to note that S3 does not store the encryption key you provide. Instead, AWS store a randomly salted HMAC value of the encryption key in order to validate future requests. The salted HMAC value cannot be used to derive the value of the encryption key or to decrypt the contents of the encrypted object. That means that if you lose the encryption key, you lose the object.
3.1.3.3.2. Client-Side Encryption
Client side encryption happens before your data is uploaded into your S3 bucket. In this case, you manage the encryption process, the encyption keys, and related tools. There are 2 options for client-side encryption:
- AWS KMS managed customer master key (CSE-KMS). You don’y have to worry about providing any encryption keys to S3 encryption client. Instead, you provide only an AWS KMS customer master key ID, and the client does the rest.
- Customer managed master encryption keys (CSE-C). You use your own client-side master key. When using your client-side master keys, your client-side master keys and your unencrypted data is never sent to AWS. It is important that you safely manage your encryption keys. If you lose them, you don’t be able to decrypt your data.

Access decision process
This is how client-side encryption using client-side master key works:
- When uploading an object. You provide a client-side master key to the Amazon S3 encryption client. The client uses the master key only to encrypt the data encryption key that it generates randomly. The process works like this:
- The Amazon S3 encryption client generates a one-time-use symmetric key (also known as a data encryption key or data key) locally. It uses the data key to encrypt the data of a single Amazon S3 object. The client generates a separate data key for each object.
- The client encrypts the data encryption key using the master key that you provide. The client uploads the encrypted data key and its material description as part of the object metadata. The client uses the material description to determine which client-side master key to use for decryption.
- The client uploads the encrypted data to Amazon S3 and saves the encrypted data key as object metadata (x-amz-meta-x-amz-key) in Amazon S3.
- When downloading an object. The client downloads the encrypted object from Amazon S3. Using the material description from the object’s metadata, the client determines which master key to use to decrypt the data key. The client uses that master key to decrypt the data key and then uses the data key to decrypt the object.
Note
Default Encryption is an option that allows you to enable automatically encrypt of all new objects written to your Amazon S3 bucket using either SSE-S3 or SSE-KMS. This property does not affect existing objects in your bucket.
3.1.3.4. AWS Config
Once you have completed AWS Config setup, you can use the AWS Config built in rules for Amazon S3.
s3-bucket-logging-enabled. Checks whether logging is enabled for your S3 buckets.s3-bucket-public-read-prohibited. Checks that your S3 buckets do not allow public read access. If a S3 bucket policy or bucket ACL allows public read access, the bucket is noncompliant.s3-bucket-public-write-prohibited. Checks that your S3 buckets do not allow public write access. If a S3 bucket policy or bucket ACL allows public write access, the bucket is noncompliant.s3-bucket-ssl-requests-only. Checks that your S3 buckets have policies that require requests to use SSL.s3-bucket-versioning-enabled. Checks whether versioning is enabled for your S3 buckets. Optionally, the rule checks if MFA delete is enabled in your S3 buckets.
3.1.3.5. AWS CloudTrail
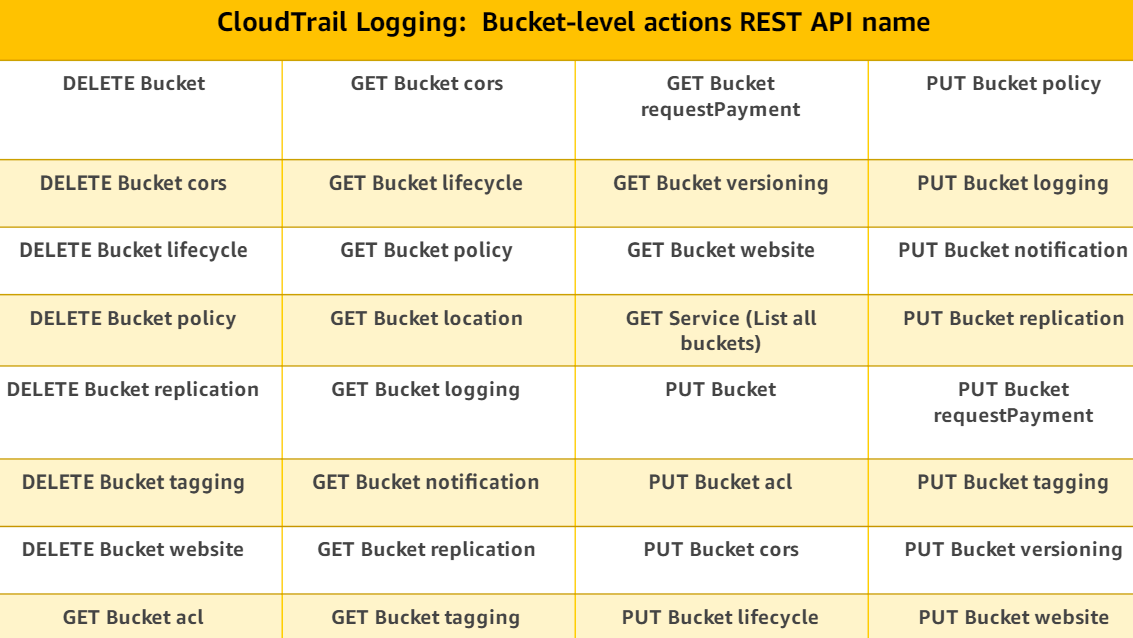
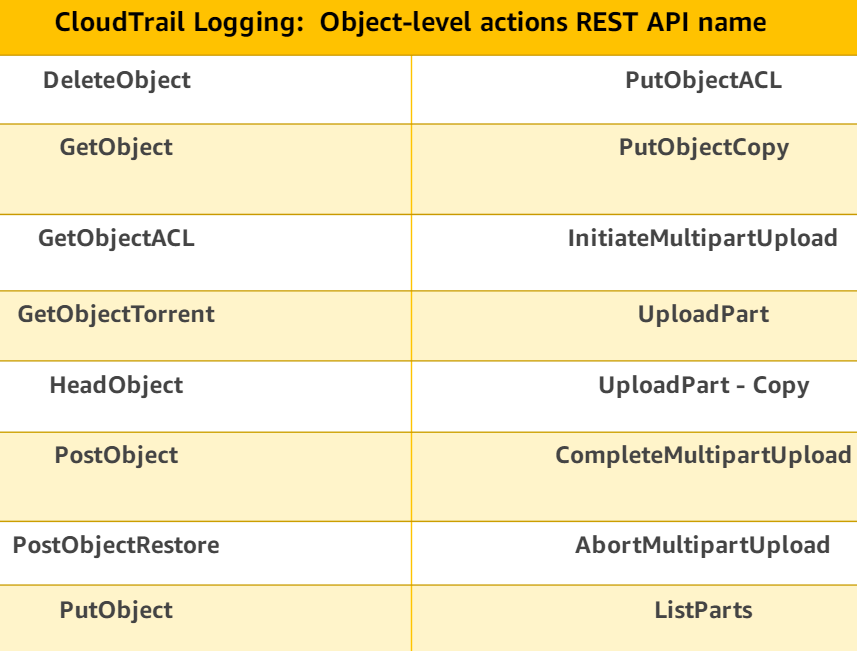
AWS CloudTrail is the API logging service in AWS that provide fine grained access tracking for your Amazon S3 buckets and objects. For each request, CloudTrail captures and logs who made the API call, when it was made, what resources were affected. By default, CloudTrail logs capture bucket level operations. You can additionally capture object level actions when S3 Data Events are enabled
CloudTrail also integrates with CloudWatch and you can utilize CloudWatch alarms to notify you of certain events or to take actions based on your configuration. When utilizing CloudTrail, the Amazon S3 data events are delivered to CloudWatch Events within seconds so you can configure your account to take immediate action on a specified activity to improve your security posture. Additionally, CloudTrail logs are delivered to CloudWatch logs and S3 within 2-5 minutes.
CloudTrail logging can be enabled at the bucket or prefix level. You can filter your logging based on reads or writes or include both.
Additionally, AWS CloudTrail allows you to automatically add your new and existing S3 buckets to S3 Data Events. S3 Data Events allow you to record API actions on S3 objects and receive detailed information such as the AWS account, IAM user role, and IP address of the caller, time of the API call, and other details. Previously, you had to manually add individual S3 buckets in your account to track S3 object-level operations, and repeat the process for each new S3 bucket. Now, you can automatically log Amazon S3 Data Events for all of your new and existing buckets with a few clicks.
When enabling CloudTrail for S3 bucket you will need to make sure your destination bucket has the proper permissions to allow CloudTrail to deliver the log files to your bucket. CloudTrail will automatically attach the required permissions if you create a bucket as part of creating or updating a trail in the CloudTrail console or create a bucket with the AWS CLI create-subscription and update-subscription commands.
If you specified an existing S3 bucket as the storage location for log file delivery, you must attach a policy to the bucket that allows CloudTrail to write the bucket. Amazon S3 Bucket Policy for CloudTrail. As a best practice, it is recommended to use a dedicated bucket for CloudTrail logs.
3.1.3.6. Security inspection
You can verify if you are meeting your security needs with various AWS tools:
To verify if objects in your bucket are encrypted, you can use Amazon S3 Inventory.
To know if any of your buckets are publicly accessible, there are 2 ways:
- AWS TrustedAdvisor, which can check your S3 bucket permissions and list the buckets the have open access. Set a CloudWatch alarm to alert you should any buckets fail the check.
- Using AWS TrustedAdvisor technology, the S3 console now includes a bucket permissions check. A new column, called Access, shows any buckets that have public access. If you click on the bucket where it shows public access ou can then see which policy is granting public access as well by going to the Permissions tab.
For Amazon S3 there are 3 checks you might want to look at: Amazon S3 bucket permissions, bucket logging, and bucket versioning.
3.1.3.7. Amazon Macie
Amazon Macie is a security service that uses machine learning to automatically discover, classigy, and protect sensitive data in AWS. It will search your Amazon S3 bucket for personally identifiable information (PII), personal health information (PHI), access keys, credit card information and other sensitive data and alert you if you have insecure data. It uses S3 CloudTrail Events to see all of the requests that are sent to your Amazon S3 bucket and uses ML to determine patterns and will alert if there is anything suspicious or if the patterns change.
Amazon Macie can answer the following questions:
- What data do I have in the cloud?
- Where is it located?
- How is data being shared and stored?
- How can I classify data in near-real time?
- What personally identifiable information or personal health information is possibly exposed?
- How do I build workflow remediation for my security and compliance needs?
3.1.4. Amazon S3 Storage Management
Among the different options that are available to configure on buckets and objects are the following: Versioning, Server access logging, object-level logging, Static website hosting, default encryption, object tags, Transfer Acceleration, events notification, requester pays.
3.1.4.1. Versioning
Be enabling versioning, you can create a data protection mechanism for your Amazon S3 bucket. With versioning enabled on your bucket, you are able to protect your objects from accidental deletion or overwrites. Versioning is applied at the bucket level and all the objects in your bucket will have this feature applied. There is no performance penalty for versioning and it is considered a best practice. Once enabled you have also essentially created a recycle bin for your bucket.
Rather than a hard delete on an object, when versioning is enabled it creates a delete marker. You can then remove this delete marker and you have your origional object back. Objects cannot be partially updated, so tulizing versioning still does not allow you to just update a portion of the object.
To efficiently control your storage capacity and keep it to only the proper amount required, you can utilize lifecycle policies to move versions of objects to the appropriate storage class as well as expire old versions if needed, providing you with an automatic cleanup process for your data.
3.1.4.2. Server access logging
In order to track requests for access to your bucket, you can enable access logging. Each access log record provides details about a single access request, such as the requester, bucket name, request time, request action, response status, and error code, if any. Access log information can be useful in security and access audits. It can also help you learn about your customer base and understand your Amazon S3 bill. There is no extra charge for enabling server across logging on an Amazon S3 bucket; however, any log files the system delivers to you will accrue the usual charges for storage.
By default, logging is disabled. To enable access logging, you must do the following:
- Turn on the log delivery by adding logging configuration on the bucket for which you want S3 to deliver access logs.
- Grant the Amazon S3 Log Delivery Group write permission on the bucket where you want the access logs saved.
If you use the Amazon S3 console to enable logginf on a bucket, the console will both enable logging on the source bucket and update the ACL on the target bucket to grant write permission to the Log Delivery Group
3.1.4.3. Object-level logging
To help ensure security if your data, you need the ability to audit and monitor access and operations, you can do that by enabling object-level logging with AWS CloudTrail integration. AWS CloudTrail logs capture bucket level and object level requests. For each request, the log includes who made the API call, when it was made, what resources were affected. You can use a CloudTrail log to understand your end users’ behavior and tune access policies for tighter access control.
AWS CloudTrail Data Events allows you to log object level activity such as puts, gets, and deletes, the logs includes account, IAM user, IP address, and more. This can be configured with CloudWatch Events to take action when changes are made. For example, if any object ACL is changed, you can automatically ahe the change reverted as needed.
3.1.4.4. Static website hosting
Enabling this option allows you to host static websites using just your S3 bucket, no additional servers are required. On a static website, individual webpages include static content. They might also contain client-side scripts. By contrast, a dynamic website relies on server-side processing, including server-side scripts such as PHP, JSP, or ASP.NET. Amazon S3 does not support server-side scripting. To host a static website, you configure and Amazon S3 bucket for website hosting, and then upload your website content to the bucket. The website is then available at the AWS Region-specific website endpoint of the bucket: <bucket-name>.s3-website-<AWS-region>.amazonaws.com.
There are several ways you can manae your bucket’s website configuration. You can use the AWS Management Console to manage configuration without writing any code or you can programmatically create, update, an delete the website configuration by using the AWS SDKs.
Here are the prerequisites for routing traffic to a website that is hosted in an Amazon S3 Bucket:
- An S3 bucket that is configured to host a static website. The bucket must have the same name as your domain or subdomain. For example, if you want to use the subdomain
<bucket-name>.s3-website-<AWS-region>.amazonaws.com, the name of the bucket must be <bucket-name>.
- A registered domain name. You can use Route 53 as your domain registrar, or you can use a different registrar.
- Route 53 as the DNS service for the domain. If you register your domain name by using Route 53, AWS configure Route 53 as the DNS service for the domain.
3.1.4.5. Object tags
You can organizate your data by serveral dimensions:
- Location, by bucket and prefixes.
- Nature of the data. You can take advantage of object tagging to apply more granular control.
Amazon S3 tags are key-value pairs that can be created with the console, CLI or via APIs. The key name value you create is case sensitive and you can have up to 10 tags assigned to an object. With object tags, you can control access, lower coste with lifecycle policies, analyze your data with storage class analytics, and monitor performance with CloudWatch metrics.
Here is an example of setting access permission using tags. If you want to give a user permission to GET objects in your bucket that have been tagged as Project X, you can use a condition as seen in the example to allow them access to any object or bucket tagged with Project X.
This simplifies some of your security by being able to easily allow and deny users access to specific objects and buckets using policies and tags.
{
    "Version": "2012-10-17",
    "Statement": [
        {
            "Effect": "Allow",
            "Action": [
                "s3:GetObject"
            ],
            "Resource": "arn:aws:s3:::Project-bucket/*"
            "Condition": {
                "StringEquals": {
                    "s3:RequestObjectTag/Project": "X"
                    }
             }
        }
    ]
}
3.1.4.6. Transfer Acceleration
Amazon S3 Transfer Acceleration enables fast, easy, and secure transfers of files over long distances between your client and your Amazon S3 bucket. Transfer Acceleration leverages Amazon CloudFront’s globally distributed AWS Edge Locations. As data arrives at an AWS Edge Location, data is routed to your Amazon S3 bucket over an optimized network path.

Amazon S3 Transfer Acceleration can speed up content transfers to and from Amazon S3 by as much as 50-500% for long-distance transfer of larger objects. Customers who have either web or mobile applications with widespread users or applications hosted far away from their S3 bucket can experience long and variable upload and download speeds over the Internet. S3 Transfer Acceleration (S3TA) reduces the variability in Internet routing, congestion and speeds that can affect transfers, and logically shortens the distance to S3 for remote applications. S3TA improves transfer performance by routing traffic through Amazon CloudFront’s globally distributed Edge Locations and over AWS backbone networks, and by using network protocol optimizations. Enabling Transfer Acceleration provides you with a new URL to use with your application.
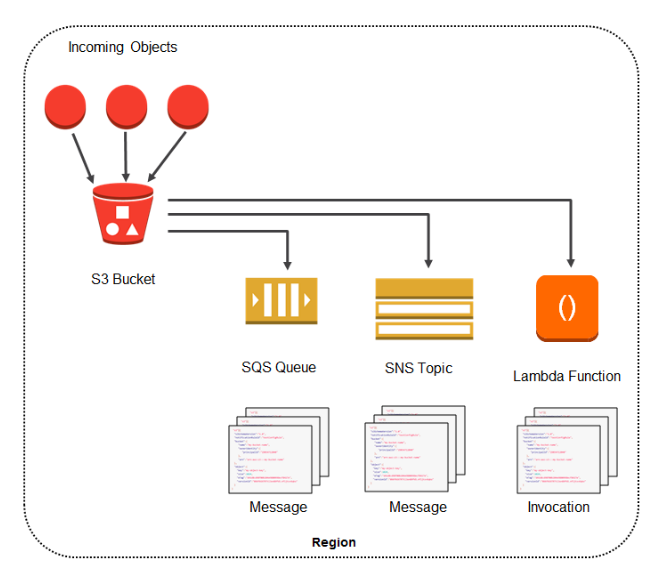
3.1.4.7. Event notifications
Events will enable you to receive notifications based on events that occur in your bucket. The S3 notification feature enables you to receive notifications when certain events happen in your bucket, for example: you can receive a notification when someone uploads new data to your bucket.
To enable notifications, you must first add a notification configuration identifying the events you want Amazon S3 to publich, and the destinations where you want S3 to send the event notifications. S3 events integrate with SNS, SQS and AWS Lambda to send notifications.
Here’s what you need to do in order to start using this event notifications with your application:
- Create the queue, topic, or Lambda function (which I’ll call the target for brevity) if necessary.
- Grant S3 permission to publish to the target or invoke the Lambda function. For SNS or SQS, you do this by applying an appropriate policy to the topic or the queue. For Lambda, you must create and supply an IAM role, then associate it with the Lambda function.
- Arrange for your application to be invoked in response to activity on the target. As you will see in a moment, you have several options here.
- Set the bucket’s Notification Configuration to point to the target.
3.1.4.8. Requester pays
A bucket owner can configure a bucket to be a Requester Pays bucket. With Requester Pays buckets, the requester instead of the bucket owner pays the cost of the request and the data download from the bucket. The bucket owner always pays the cost of storing data. You might, for example, use Requester Pays buckets when making availale large data sets, such as zip code directories, reference data, geospatial information, or web crawling data.
3.1.4.9. Object Lifecycle policies
To manage your objects so they are stored cost effectively throughout their lifecycle, you can configure lifecycle rules. A lifecycle configuration or lifecycle policy, is a set of rules that define the actions that S3 applies to a group of objects. A lifecycle rule can apply to all or a subset of objects in a bucket based on the filter element that you specify in the lifecycle rule. A lifecycle configuration can have up to 1000 rules. These rules also have a status element where it can be either enabled or disabled. If a rule is disabled, S3 doesn’t perform any of the actions defined in the rule. Each rule defines an action. The actions can be either a transition of objects to another storage class or an expiration of objects.
3.1.4.9.1. Automate transitions
You can automate the tiering process from one storage class to another. There are some considerations you should be aware of:
- There is no automatic transition of objects less than 128 KB in size to S3 Standard - IA or S3 One Zone - IA.
- Data must remain on its current storage class for at least 30 days before it can be automatically moved to S3 Standard - IA or S3 One Zone - IA.
- Data can be moved from any storage class directly to Amazon Glacier.
3.1.4.9.2. Action types
You can direct S3 to perform specific actions in an object’s lifetime by specifying one or more of the following predefined actions in a lifecycle rule. The effect of these actions depends on the versioning state of your bucket.
- Transition. You can tell S3 to transition objects to another S3 storage class. A transition can move objects to the S3 Standard - IA or S3 One Zone - IA or Amazon Glacier storage classes based on the object age you specify.
- Expiration. Expiration deletes objects after the time you specify. When an object reaches the end of its lifetime, S3 queues it for removal and removes it asynchronously.
In addition, S3 provides the following actions that you can use to manage noncurrent object versions in a version-enabled bucket:
- On a versioning-enabled bucket, if the current object version is not a delete marker, S3 adds a delete marker with a unique version ID. Theis makes the current version noncurrent, and delete makerr the current version.
- On a versioning-suspended bucket, the expiration action causes S3 to create a delete marker with null as the version ID. This delete marker replaces any object version with a null version ID in the version hierarchy, which effectively deletes the object.
You can also combine actions for a completely automated lifecycle.
3.1.4.9.3. Parameters
You can set lifecycle configuration rules based on the bucket, the object or object tags.
3.1.4.9.4. Versions
You can configure your lifecycle configuration rules to take an action on a particular version of an object, either the current version or any previous versions.
3.1.4.9.5. Transitioning objects
From S3 Standard you can transition to any of other storage classes (Standard-IA, One Zone-IA and Glacier) using lifecycle configuration rules, but there are some constraints:
- S3 does not support transition of objects less than 128 KB.
- Objects must be stored for at least 30 days before you can transition to S3 Standard-IA or to One Zone-IA. S3 doesn’t transition objects within the first 30 days because newer objects are often accessed more frequently or deleted sooner than is suitable for S3 Standard-IA or to S3 One Zone-IA storage.
- If you are transitioning noncurrent objects in version-enabled buckets, for example a particular version of an object, you can transition only objects that are least 30 days noncurrent to S3 Standard-IA or One Zone-IA storage.
From S3 Standard-IA you can transition to S3 One Zone-IA or to Amazon Glacier using lifecycle configuration rules, but there is a constraint:
- Objects must be stored at least 30 days in the S3 Standard-IA storage class before you can transition them to the S3 One Zone-IA class.
You can only transition from S3 One Zone-IA to Glacier using lifecycle configuration rules.
You cannot transition from Glacier to any storage class. When objects are transitioned to Glacier using lifecycle configurations, the objects are visible and available only through S3, not through Glacier. You can access them using the S3 console or the S3 API but not through Glacier console or Glacier API in this scenario.
Amazon S3 supports a waterfall model for transitioning between storage classes, as shown in the following diagram.

Lifecycle configuration: Transitioning objects
3.1.4.10. Amazon S3 inventory
In order to help you manage your data you may need to get a list of objects and their associated metadata. S3 has a LIST API that can provide this function, but a new and less costly alternative is the Amazon S3 Inventory service. You can use it to audit and report on the replication and encryption status of your objects for business, compliance, and regulatory needs. Amazon S3 provides a CSV or ORC file output of your objects and their corresponding metadata on a daily or weekly basis for an S3 bucket or a shared prefix.
You can configure what object metadata to include in the inventory, whether to list all object versions or only current versions, where to store the inventory list flat-file output, and whether to generate the inventory on a daily or weekly basis. Amazon S3 inventory costs half of what it costs to run the LIST API, and itis readily available when you need it since it’s scheduled. The inventory report objects can also be encrypted using either SSE-S3 or SSE-KMS.
You have object level encryption status field in the report to give you this visibility or audits and reporting for compliance. You can query the S3 inventory report directly from Amazon Athena, Redshift Spectrum, or any Hive tools.
The inventory report can live in the source bucket or can be directed to another destination bucket.
The source bucket contains the objects that are listed in the inventory and contains the configuration for the inventory.
The destination bucket contains the flat file list and the manifest.json file that lists all the flat file inventory lists that are stored in the destination bucket. Additionally, the destination bucket for the inventory report must have a bucket policy configured to grant S3 permission to verify ownership of the bucket and permission to write files to the bucket, it must be in the same region as the source bucket it is listing, and it can be the same as the source bucket. Also the destination bucket can be in another AWS account. When creating any filters for your inventory report, it should be noted that tags cannot be used in the filter.
You can set up an Amazon S3 event notification to receive notice when the manifest checksum file is created, which indicates that an inventory list has been added to the destination bucket.
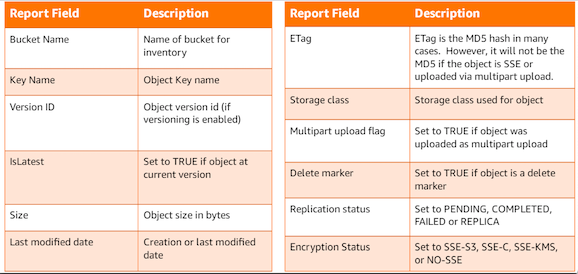
Fields that are contained in the Inventory report
3.1.4.11. Cross-region replication
Cross-region replication (CRR) is a bucket-level feature that enables automatic, asynchronous replication of objects across buckets in different AWS regions. To activate this feature, you add a replication configuration to your source bucket. To configure, you provide information such as the destination bucket where you want objects replicated to. The destination bucket can be in either the same account or another AWS account. Once enabled you will only replicate new PUTs or new object creation. Any existing objects in your bucket will need to be manually copied to the destination.
You can request S3 to replicate all or a subset of objects with specific key name prefixes. Deletes and lifecycle actions are not replicated to the destination. If you delete an object in the source, it will not be deleted in the destination bucket. Additionally, any lifecycle policies you have on the source bucket will only be applied to that bucket. If you wish to enable lifecycle policies on the destination bucket, you will have to do so manually.
To ensure security, S3 encrypts all data in transit accross AWS regions using SSL/TLS. In addition to the secure data transmission, CRR can support the replication of server side encrypted data. If you have SSE objects, either SSE-S3 or SSE-KMS, then CRR will replicate these keys to the remote region.
You might configure CRR on the bucket for various reasons. Some common use cases are:
- Compliance requirements. Although, by default, S3 stores your data across multiple geographically distant AZs, compliance requirements might dictate that you store data at even further distances. CRR allows you to replicate data between distant AWS regions to satisfy these compliance requirements.
- Minimize latency. Your customers might be in 2 geographic locations. To minimize latency in accessing objects, you can maintain object copies in AWS regions that are geographically closer to your users.
- Operational reasons. You might have compute clusters in 2 different regions that analyze the same set of objects. You might choose to maintain object copies in those regions.
- Data protection. You might have a need to ensure your data is protected, ensuring you have multiple copies of your most important data for quick recovery or business continuity reasons.
There are some requirements you should be aware of for using and configuring CRR:
- The source and destination buckets must have versioning enabled.
- The source and destination buckets must be in different AWS Regions.
- S3 must have the proper permissions to replicate objects from the source bucket to the destination bucket on your behalf.
You can now overwrite ownership when replication to another AWS account. CRR supports SSE-KMS encrypted objects for replication. You can choose a different storage class for your destination bucket. You can replicate to any other AWS region in the world for compliance or business needs or for costs considerations. You can have bi-directional replication. This means you can replicate source to destination and destination back to source. You will have independent lifecycle policies on the source and destination buckets.
If you want to prevent malicious delete of the secondary copy, you can take advantage of the ownership overwrite feature. You can also choose to replicate to another AWS account with CRR. When choosing another AWS account as the destination, you can enable ownership overwrite and S3 will replicate your data and change the ownership of the object to the owner of the destination bucket.
3.1.4.12. Trigger-based events
You can automate function based on events. You can use notifications when objects are created via PUT, POST, COPY, DELETE or a multipart upload. You can also filter the event notification on prefixes and suffixes of your objects, so you can ensure you only get the event notification you want and not just on the whole bucket. For example, you can choose to receive notifications on object names that start with “images/”. You can then trigger a workflow from an event notification sent to SNS, SQS or Lambda. The benefits of this feature are:
- Simplicity. Notifications make it simple to focus on applications by attaching new functionality driven by events. There is no need to manage fleets of EC2 instances to process a queue.
- Speed. For example, if you need processing to occur quickly when new objects arrive in your bucket. On average, notifications are sent in less that 1 second.
- Integration. Use services to connect storage in S3 with workflows. You can architect an application in a new way, where blocks of code or workflows are invoked by changes in your data.
3.1.4.13. Avoid accidental deletion
To avoid accidental deletion in Amazon S3 bucket, you can:
- Enable Versioning.
- Enable MFA (Multi-Factor Authentication) Delete.
Versioning is a means of keeping multiple variants of an object in the same bucket. You can use versioning to preserve, retrieve, and restore every version of every object stored in your Amazon S3 bucket. With versioning, you can easily recover from both unintended user actions and application failures.
If the MFA (Multi-Factor Authentication) Delete is enabled, it requires additional authentication for either of the following operations:
- Change the versioning state of your bucket.
- Permanently delete an object version.
3.1.4.14. S3 consistency
Amazon S3 provides read-after-write consistency for PUTS of new objects in your S3 bucket in all regions with one caveat: if you make a HEAD or GET request to the key name (to find if the object exists) before creating the object, Amazon S3 provides eventual consistency for read-after-write. Amazon S3 offers eventual consistency for overwrite PUTS and DELETES in all regions.
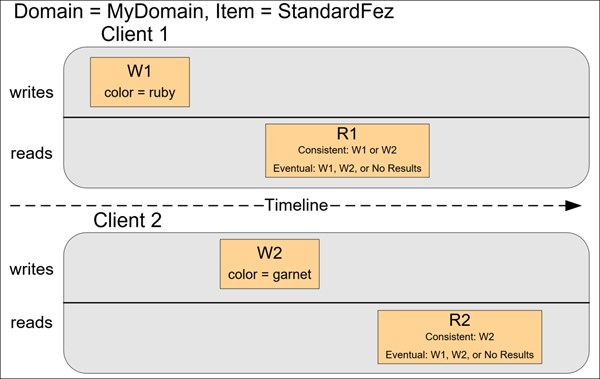
S3 consistency
Updates to a single key are atomic. For example, if you PUT to an existing key, a subsequent read might return the old data or the updated data, but it will never return corrupted or partial data. This usually happens if your application is using parallel requests on the same object.
Amazon S3 achieves high availability by replicating data across multiple servers within Amazon’s data centers. If a PUT request is successful, your data is safely stored. However, information about the changes must replicate across Amazon S3, which can take some time, and so you might observe the following behaviors:
- A process writes a new object to Amazon S3 and immediately lists keys within its bucket. Until the change is fully propagated, the object might not appear in the list.
- A process replaces an existing object and immediately attempts to read it. Until the change is fully propagated, Amazon S3 might return the prior data.
- A process deletes an existing object and immediately attempts to read it. Until the deletion is fully propagated, Amazon S3 might return the deleted data.
- A process deletes an existing object and immediately lists keys within its bucket. Until the deletion is fully propagated, Amazon S3 might list the deleted object.
Amazon S3 support for parallel requests means you can scale your S3 performance by the factor of your compute cluster, without making any customizations to your application. Amazon S3 does currently support Object Locking: Locking Objects Using Amazon S3 Object Lock.
Updates are key-based; there is no way to make atomic updates across keys. For example, you cannot make the update of one key dependent on the update of another key unless you design this functionality into your application.
3.1.5. Monitoring and analyzing Amazon S3
3.1.5.1. Storage class analysis
You might ask yourself, which part of my data is cold or hot? What is the right lifecycle policy for my data? Let’s look at ways that you can save storage costs by leveraging storage class analysis. Storage class analysis allows you get some intelligence around object access patterns that will give you some guidance aroung the optimal transition time to a different storage class.
Storage class analysis delivers a daily-updataed report of object access patterns in your S3 console that helps you visualize how much of your data is hot, warm, or cold. Then, after about a month of observation, Storage class analysis presents you with recommendations for lifecycle policy settings designed to reduce TCO. it does this by monitoring object access patterns over that period of time, and populates a series of visualizations in your S3 console.
By using Amazon S3 Storage class analysis you can analyze storage access patterns to help you decide hwn to transition the right data to the right storage class. It will provide a visualization of your data access patterns over time, measure the object age where data is infrequently accessed, and enable you to deep dive by bucket, prefix or object tag. Storage class analysis also provides daily visualizations of your storage usage in the AWS Management console. You can optionally export files that include a daily report of usage, retrieved bytes, and GETs by object age to a S3 bucket to analyze using the BI tools of your choice, such as Amazon QuickSight.
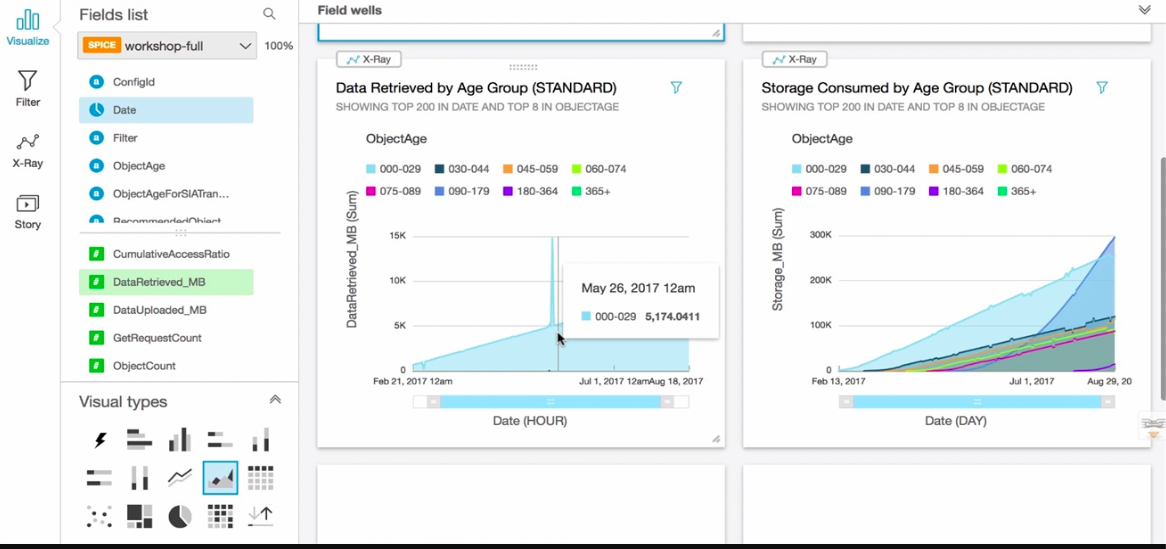
Storage class analysis QuickSight dashboard
3.1.5.2. Amazon CloudWatch metrics
Amazon CloudWatch metrics for Amazon S3 can help you understand and improve the performance of applications that use S3. There are 2 types of CloudWatch metrics for Amazon S3, storage metrics and request metrics.
Daily storage metrics for buckets are reported once per day for bucket size and number of objects and metrics, it is included at no additional cost.
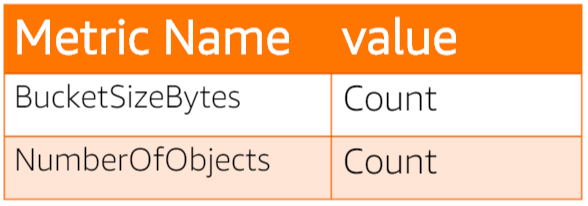
Daily storage metrics
Additionally you can enable Request metrics. There is an additional cost for these metrics. You can receive 13 metrics the are available at 1-minute intervals. Once enabled, these metrics are reported for all object operations.
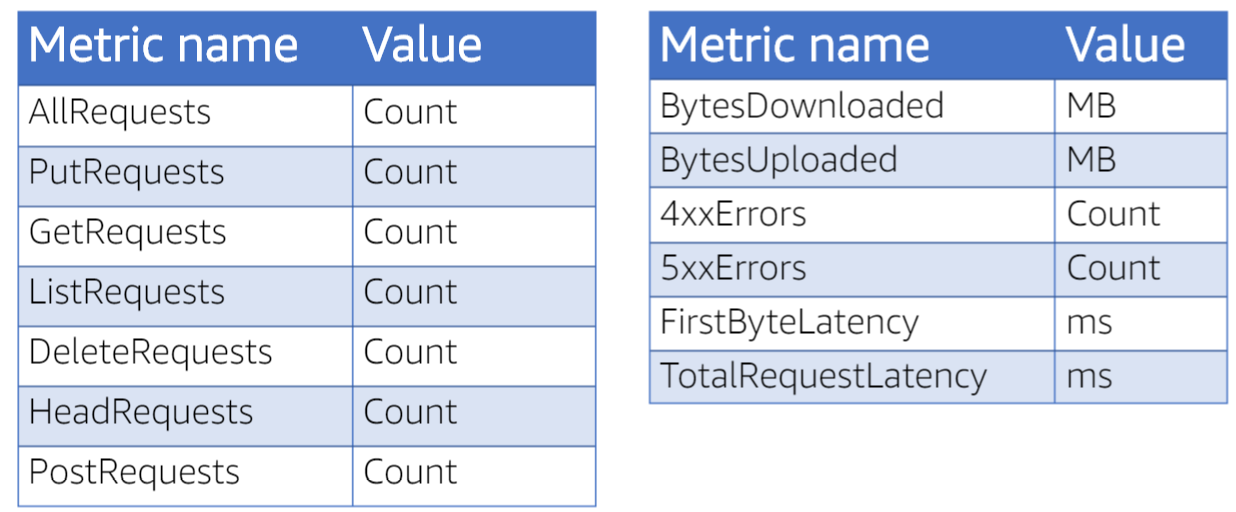
Request metrics
3.1.5.3. Amazon CloudWatch logs
Amazon CloudWatch logs is a feature of CloudWatch tht you can use specifically to monitor log data. Integration with Amazon CloudWatch logs enables CloudTrail to send events containing API activity in your AWS account to a CloudWatch Logs log group. CloudTrail events that are sent to CloudWatch Logs an trigger alarms according to the metric filters you define. You can optionally configure CloudWatch alarms to send notifications or make changes to the resources that you are monitoring based on log stream events that your metric filters extract.
Using Amazon CloudWatch Logs, you can also track CloudTrail events alongside events from the OS, applications, or other AWS services that are sent to CloudWatch Logs. For example, you may want to be alerted if someone changes or deletes a bucket policy, lifecycle rule or other configuration.
3.1.6. Optimizing performance in Amazon S3
Amazon S3 now provides increased performance to support at least 3,500 requests per second to add data and 5,500 requests per second to retrieve data, which can save significant processing time for no additional charge. Each S3 prefix can support these request rates, making it simple to increase performance significantly.
Applications running on Amazon S3 today will enjoy this performance improvement with no changes, and customers building new applications on S3 do not have to make any application customizations to achieve this performance. Amazon S3’s support for parallel requests means you can scale your S3 performance by the factor of your compute cluster, without making any customizations to your application. Performance scales per prefix, so you can use as many prefixes as you need in parallel to achieve the required throughput. There are no limits to the number of prefixes.
This S3 request rate performance increase removes any previous guidance to randomize object prefixes to achieve faster performance. That means you can now use logical or sequential naming patterns in S3 object naming without any performance implications. This improvement is now available in all AWS Regions.
When using Amazon S3 it is important to consider the following best practices:
- Faster uploads over long distances with Amazon S3 Transfer Acceleration.
- Faster uploads for large objects with Amazon S3 multipart upload.
- Optimize GET performance with Range GET and CloudFront.
- Distribute key name for high RPS workload.
- Optimize list with Amazon S3 inventory.
3.1.6.1. High requests per second
In some cases, you may not need to overly concerned about what your key names are, as S3 can handle thousands of requests per second (RPS) per prefix. This is not to say that prefix naming should not be taken into consideration, but rather that you may or may not fall into the category of high request rates of over 1000 RPS on a given prefix in your bucket.
However, if you will regularly performing over 1000 RPS, then you should take care with your key naming scheme to avoid hot spots which could lead to poor performance. The 2 most common schemes which can lead to hotspoting are daa based kays and monotonically increased numbers. These schemes do not partition well due to the sameness at the begin of the key. Objects in S3 are distributed across S3 infrastructure according to the object’s full name (that is, its key). The object keys are stored in S3’s indexing layer. S3 splits the indexing layer into partitions and stores keys within those partitions based on the prefix. S3 will also split these partitions automatically to handle an increase in traffic. What is important to understand is that your key name alone does not necessarily show you what partition your object is stored in, as S3 is automatically partitioning objects broadly across its infrastructure for performance. When the automatic partitioning is occurring you may see a temporary increase in 503 - Slow Down responses. These should be handled like any other 5xx response, using exponential backoff retries and jitter. By using exponential backoff retries and jitter, you are able to reduce the requests per second such that they no longer exceed the maximum RPS rate. Once the partitioning in complete, the 503s will no longer be sent and you will be able to go at the higher rate.
With this in mind, you should also ensure that when you have a known expectation of a high RPS event you should request a pre-partitioning of your prefixes to ensure the optimal performance. You can contact AWS support to pre-partition your workload. You will need to provide the kay naming scheme and expected requests to PUT, GET, DELETE, LIST and AWS can then partition for you in advance in the event. As this generally takes a few days, it is recommended that you open a case at least 1-2 weeks in advance.
To avoid hot-spotting, avoid using sequential key names when you are expecting greater than 1000 RPS. It is recommended to place a random hash value at the left most part of the key. One of the easiest ways to do this is to take the MD5 or an equivalent hashing scheme like CRC of the original key name, and then take the first 3 to 4 characters of the hash and prepend that to the key. You can see in the following example that this naming scheme makes it harder to list objects that are related to each other.
awsexamplebucket/232a-2013-26-05-15-00-00/cust1234234/animation1.jpg
awsexamplebucket/7b54-2013-26-05-15-00-00/cust3857422/video2.jpg
awsexamplebucket/91c-2013-26-05-15-00-00/cust1248473/photo3.jpg
To help with that, you can use a small set of prefixes to organize your data. Deciding where the random value such as the hash should be placed can be confusing. A recommendation is to place the hash after the more static portion of your key name, but before values such as dates and monotonically increasing numbers.
awsexamplebucket/animations/232a-2013-26-05-15-00-00/cust1234234/photo1.jpg
awsexamplebucket/videos/7b54-2013-26-05-15-00-00/cust3857422/video2.jpg
awsexamplebucket/photos/91c-2013-26-05-15-00-00/cust1248473/photo3.jpg
Even with good partitioning, bad traffic that heavily hits one prefix can still create hot partitions, which can be confusing if you have already pre-partitioned the bucket. An example of this cloud be a bucket that has keys that are UUIDs. In theory, this can be good for bucket partitioning, but if you copy these keys between buckets, or from the bucket to local hosts, it will list the keys alphabetically causing all the requests to hit “000”, then “001”, “002”, etc. potentially creating a hotspot.
3.1.6.2. High throughput
The most common design pattern used by customers for performance optimization is parllelization. Parallezation can be achieved in 2 ways: one is to have multiple connections to upload your data and the other is multipart uploads. You should also take into consideration the network throughput of the hosts and devices along the network path when you are uploading data. For example, if you are using EC2, you may want to choose netwoek optimized best network performance when using parallel uploads or downloads.
3.1.6.3. Multipart uploads
The multipart upload API enables you to upload large objects in a set of parts and you can also upload those parts in parallel. Multipart uploading is a three-step process:
- You initiate the upload:
InitiateMultipartUpload(partSize) -> uploadId - Upload the object parts:
UploadPart(uploadId,data) - Complete the multipart upload:
CompleteMultipartUpload(uploadId) -> objectId
Upon receiving the complete multipart upload request, S3 contructs the object from the uploaded parts, and you can then access the object just as you would any other object in your bucket.

In general, when your object size reaches 100 MB, you should consider using multipart uploads instead of a single object upload. Also consider using multipart upload when uploading objects over a spotty network, this way you only need to retry the parts that were interrupted, this increasing the resiliency for your application. Using multipart upload provides a few advantages. The following are some examples:
- Improved throughput. You can upload parts in parallel to improve throughput.
- Quick recovery from any network issues. A smaller part size minimizes the impact of restarting a failed upload due to a network error.
- Pause and resume object uploads. You can upload object parts over time. Once you initiate a multipart upload there is no expiry; you must explicitly complete or abort the multipart upload.
- Begin an upload before you know the final object size. You can upload an object as you are creating it.
You should also remember to use AbortImcompleteMultipartUpload action in case your upload doesn’t complete to avoid unwanted storage costs of abandoned multipart uploads. You can configure the AbortImcompleteMultipartUpload in the lifecycle rules configuration of your bucket in the S3 console. This directs S3 to abort multipart uploads that don’t complete within a specified number of days after being initiated. When a multipart upload is not completed within the time frame, it becomes eligible for an abort operation and S3 aborts the multipart upload and deletes the parts associated with the multipart upload.
There are also some tools that can be used in S3 for multipart uploads such as TransferManager which is part of S3 SDK for Java. TransferManager provides a simple API for uploading content to S3, and makes extensive use of S3 multipart uploads to achieve enhanced throughput, performance and reliability. When possible, TransferManager attempts to use multiple threads to upload multiple parts of a single upload at once. When dealing with large content size and high bandwidth, this can have a significant increase on throughput.
3.1.6.4. Amazon CloudFront
You can consider using Amazon CloudFront in conjunction with Amazon S3 to achieve faster downloads.
3.1.6.5. Transfer Acceleration
With Transfer Acceleration, as the data arrives at an edge location, data is routed to S3 over an optimized network path. Each time you use Transfer Acceleration to upload and object, AWS will check whether Transfer Acceleration is likely to be faster than a regular S3 transfer. If AWS determines that Transfer Acceleration us not likely to be faster than a regular S3 transfer of the same object to the same destination AWS region, AWS will not charge for that use of Transfer Acceleration for that transfer, and may bypass Transfer Acceleration for that upload. You can test and see if Amazon S3 Transfer Acceleration will provide you a benefit by going to Amazon S3 Transfer Acceleration - Speed Comparison.
A possible use case is: Let’s say you transfer data on a regular basis across continents or have frequent uploads from distributed locations. Transfer Acceleration can, route your data to the closest edge location, so it travels a shorter distance on the public internet and majority of the distance on an optimized network on the Amazon backbone. Moreover, Transfer Acceleration is that it uses standard TCP and HTTP/HTTPS so it does not require any FW exceptions or custom software installation.
When using Transfer Acceleration, additional transfer charges may apply.
3.1.6.6. Optimize List with Inventory
You can help optimize getting this list by using Amazon S3 inventory. If using the LIST API, this may take some time to parse through all the objects and add time to running the process for your application. By using Amazon S3 inventory, you can have your application parse through the flat file which inventory has produced helping decrease the amount of time required to list your objects.
3.1.7. Amazon S3 Cost and Billing
3.1.7.1. Amazon S3 charges
AWS always bills the owner of the S3 bucket for Amazon S3 fees, unless the bucket was created as a Request Pays bucket. To estimate the cost of using S3, you need to consider the following:
- Storage (Gbs per month). You pay for storing objects in your Amazon S3 buckets. The rate you’re charged depends on your object’s size, how long you stored the objects during the month and the storage class. You can reduce the costs by storing less frequently accessed data at slightly lower levels of redundancy then the Amazon S3 standard storage. It is important to note that each class has different rates.
- Requests. You pay for the number and type of requests. GET requests incur charges at different rates than other requests, such as PUT and COPY requests.
- Management. You pay for the storage management features. For example: S3 inventory, analytics, and object tagging, that are enabled on your account’s buckets.
- Data transfer. You pay for the amount of data transferred in and out of the Amazon S3 region, except for the following:
- Data transfer into Amazon S3 from the Internet.
- Data transfer out to an Amazon EC2 instance, when the instance is in the same AWS Region as the S3 bucket.
- Data transfer out to Amazon CloudFront.
You also pay a fee for any data transferred using Amazon S3 Transfer Acceleration.
When using the S3 Standard-IA, S3 One Zone-IA or Amazon Glacier, there are some additional charges that you can incur for retrieval. These storage classes have a minimum storage time commitment to avoid additional charges. You pay for deleting an object stored before the minimum storage commitment has passed.
- Amazon S3 Standard-IA and S3 One Zone-IA have a 30 day minimum storage requirement.
- Amazon Glacier has a 90 day minimum storage requirement.
3.1.7.2. Bills
In your AWS console in the Bills section you can see some detailed cost information for S3 for each region where you have data stored.
From the AWS console dashboard, you will be able to easily see the monthly cost per service.
3.1.7.3. Cost explorer
You can enable cost explorer from the AWS console dashboards. Once enabled, it will take 24 hours for the information to populate, and you can have the graphically view of your monthly costs per service.
New - AWS Transfer for SFTP - Fully Managed SFTP Service for Amazon S3
3.2. Amazon S3 Glacier
3.2.1. Amazon Glacier overview
3.2.1.1. Definition
At its core, Amazon Glacier is an economical, highly durable storage service optimized for infrequently used or cold data. It is widely used for workloads such as buckup, preservation archival, regulatory compliance, or as a tier for historical data in a data-lake architecture.
With Amazon Glacier, customers can store their data cost-effectively for months, years, or even decades. It enables customers to offload the administrative burdens of operating and scaling storage to AWS, so they don’t have to worry about capacity planning, HW provisioning, data replication, HW failure detection and recovery, or time-consuming HW and tape-media migrations.
Amazon Glacier is designed to deliver 11 9s of durability, and provides comprehensive security and compliance capabilities that help meet the most stringent regulatory requirements such as SEC-17A4. For data-lake architectures, Amazon Glacier provides data filtering functionality, allowing you to run powerful analytics directly on your archive data at rest. Amazon Glacier provides several data retrieval options that allow access to archives in as little as a few minutes to several hours.
3.2.1.1.1. Amazon Glacier data model
The Amazon Glacier data model is composed of vaults and archives. The concept is similar to Amazon S3’s bucket and object model. An archive can consist of any data such as photos, videos, or documents. You can upload a single file as an archive or aggregae multiple files into a TAR or ZIP file, and upload it as one archive, via either the Amazon S3 or the Amazon Glacier native API.
When storing data via Amazon Glacier-native API, a single archive can be as large as 40 TB, and an unlimited number of archives can be stored in Amazon Glacier. Each archive is assigned a unique archive ID at the time of creation, and the contents are immutable and cannot be modified. Amazon Glacier archives support only upload, download, and delete operations. Unlike Amazon S3 objects, the ability to overwrite or modify an existing archive is not supported via the Amazon Glacier-native API.
A vault is a container for storing archives. When creating a vault in Amazon Glacier, you specify a name and AWS region for your vault, and that generates a unique address for each vault resource. The general for is http://<region-specific endpoint>/<account-id>/vaults/<vault-name>. For example:
https://glacier.us-west-2.amazonaws.com/123456789/vaults/myvault
An AWS account can create vaults in any of the supported regions, and you can store an unlimited number of archives in a vault. You can create up to 1000 vaults per account, per region.
3.2.1.1.2. Amazon Glacier entry points
Currently, there are 3 methods for sending data to Amazon Glacier:
- You can run commands in the AWS CLI by using the Amazon Glacier native API, or automate your uploads via the Amazon Glacier SDK.
- You can transfer data directly by using direct AWS data ingestion tools or 3rd party software (for instance Commvault or NatApp).
- You can upload an object to an Amazon S3 bucket and use Amazon S3 lifecycle policies to transition your data to Amazon Glacier when specifed conditions are met.
To direct transfer data into Amazon Glacier, AWS Direct Connect, AWS Storage Gateway, and the AWS Snow Family are some of the options availale that allow movemtn of data into and out of Amazon Glacier. Uploads can be performed using REST-based SDKs, the AWS management console, the Amazon Glacier API, and the AWS CLI.
AWS re:Invent 2018: [REPEAT 2] Best Practices for Amazon S3 and Amazon Glacier (STG203-R2)
3.2.1.2. Benefits
Core benefits for customers who use Amazon Glacier are its unmatched durability (11 9s), availability and scalability (data is automatically distributed across a minimum of 3 physical facilities that are geographically separated), comprehensive security and compliance capabilities, query and analytics features, flexible management capabilities, and a large software ecosystem.
3.2.1.2.1. Security and compliance
Amazon Glacier’s comprehensive security capabilities begin with AES 256-bit server-side encryption with built-in key management and key protection. Customers also have the option of managing their own keys by encrypting their data before uploading to Amazon Glacier, but AES256 server-side encryption is always on and cannot be disabled.
Amazon Glacier supports many security standards and compliance certifications including PCI-DSS, HIPAA/HOTECH, FedRAMP, SEC Rule 17-a-4, EU Data Protection Directive, and FISMA, helping to satisfy compliance requirements for virtually evey regulatory agency aroung the globe. Amazon Glacier integrates with AWS CloudTrail to log, monitor, and retain storage API call activities for auditing.
Amazon Glacier encrypts your data at rest by default and supports secure data transit with SSL.
3.2.1.2.2. Query in place
Anyone who knows SQL can use Amazon Athena to analyze vast amounts of unstructures data in Amazon S3 on-demand. You can use Amazon Glacier Select to conduct filter in place operations for data-lake analytics.
3.2.1.2.3. Flexible management
Amazon Glacier and Amazon S3 offer a flexible set of storage management and administration capabilities. If you are a storage administrator, you can classify, report, and visualizae data usage trends to reduce costs and improve service levels.
Via the Amazon S3 API, objects can be tagged with unique, customizable metadata so that customers can add key-value tags that support data-management functions including lifecycle policies. The Amazon S3 inventory tool delivers daily reports about objects and their metadata for maintenance, compliance, or analytics operations. Amazon S3 can also analyze object access patterns to build lifecycle policies that automate tiering, deletion, and retention.
As Amazon S3 works with AWS Lambda, you can log activities, define alerts, and automate workflows, all without managing any additional infrastructure.
3.2.1.2.4. Large ecosystem
In addition to integration with most AWS services, the Amazon S3 and Amazon Glacier ecosystem includes tens of thousands of consulting, systems integrators, and Independent Software Vendors (ISV) partners. This means that you can easily use Amazon S3 and Amazon Glacier with popular backup, restore, and archiving solutions (including Commvault, Veritas, Dell EMC, and IBM), popular DR solutions (including Zerto, CloudEndure, and CloudRanger), and popular on-premises primary storage environments (including NetApp, Dell EMC, Rubrik, and others)
3.2.1.2.5. Amazon Glacier versus Tape solutions
Amazon Glacier is architected to deliver a tape-like customer experience, with features, performance, and a cost model that is similar in many ways to large-scale on-premises tape solutions, while eliminating the commn problems of media handling, complex technology refreshes, mass migrations, and capacity planning.
3.2.1.3. Amazon Glacier features
Amazon Glacier comes with many built-in features that help customers effectively secure, manage, and gain insights from their vaults.
Amazon Glacier supports IAM permissions that give you fine-grain controls over which users or resources have access to data stored in Amazon Glacier. In addition to this, you can attach Vault Access Policies to Amazon Glacier vaults that specify access and actions that can be peformed by a particular resource. Vault access policies can also be used to grant rad-only access to a 3rd party using a different AWS account.
To satisfy compliance needs, Amazon Glacier’s Vault Lock feature allows you to easily deploy and enforce WORM (immutability) on individual vaults via a lockable policy, per regulatory requirements such as SEC-17a4. Unlike normal access control policies, when locked, the Vault Lock policy becomes inmmutable for the life of the Vault. Vault Lock specifies archive retention time and provides the option for legal hold on archives for an indefinite period.
For retrievals, Amazon Glacier allows you to retrieve up to 5% of your data daily each month free of charge. Via the Amazon Glacier-native API, Ranged Retrievals make it easier to remain within the 5% threshold. Using the RetreivalByteRange parameter, you can fetch only the data you need from a larger file, or spread the retrieval of a larger archive over a period of time. This feature allows yoy to avoid retrieving an entire archive unnecessarily.
3.2.2. Data lifecycle management
3.2.2.1. Object lifecycle management
Object lifecycle management is a core feature of Amazon S3 that allows you to set rules objects in an Amazon S3 bucket (see Object Lifecycle policies). Files that are uploaded via the Amazon S3 API may be transitioned to Amazon Glacier in as little as 0-days. These Amazon S3 objects are then moved to an Amazon Glacier Vault but continue to be managed by the parent Amazon S3 bucket and addressed via the originally specified Amazon S3 key name. In fact, the Amazon Glacier Vault used for lifecycle transitions is privately held by the Amazon S3 parent bucket and directly accessible by customers. This is why certain use-cases, such as utilizing the Amazon Glacier Vault Lock capability, still require usage of the Amazon Glacier-native API.
In this example policy, objects that are older than 30 days are move to Amazon S3 Standard-IA, and objects that are older than 90 days are migrated to Amazon Glacier.
{
    "Rules": [
        {
            "Filter": {
                "Prefix": "logs/"
            },
            "Status": "Enabled",
            "Transitions": [
                {
                    "Days": 30,
                    "StorageClass": "STANDARD_IA"
                },
                {
                    "Days": 90,
                    "StorageClass": "GLACIER"
                }
            ],
            "Expiration": {
                "Days": 365
            },
            "ID": "example-id"
        }
    ]
}
3.2.2.2. Classifying workloads
To optimize data accesibility and storage costs, it is important to properly classify workloads before developing lifecycle policies.
3.2.2.2.1. Selecting the right storage class
When choosing the correct storage class for your workloads, ask several questions before indentifying the most appropriate storage class for your data.
- How frequently is the data being accessed? For example, you don’t want to access data moved to Standard-IA more frequently than once a month, or you may not realize the financial benefits of storing data in this class.
- How long will you store data? For example, data stored in Standard-IA is required to be stored for 30 days minimum. Customers who delete objects prior to 30 days will be charged for 30 days capacity.
When determining whether your data should be moved to Amazon Glacier, the questions to ask are:
Do I need millisecond access to my data?. If the answer is yes, for example, images that are retrieved for hosting on a live website, then Amazon Glacier is not a good fit.
How many retrieval requests are made?. Amazon Glacier has 3 different retrieval options:
- Expedited retrieval times are from 1 to 5 minutes.
- Standard ranges from 3 to 5 hours.
- Bulk is from 5 to 12 hours.
Amazon Glacier is a good option if the access frequency for Expedited retrievals is less than 3 per year, for Standard retrievals is less than 1 per month, and for Bulk retrievals is less than 4 per month.
- How long will I store the data?. Amazon Glacier is best suited for objects that will be stored periods greater than 90 days. Glacier has a 90-day minimum for the objects you store.
3.2.2.2.2. Standard class analysis
To assist customers with determining which datasets are best suited for Standard or Standard-IA, the storage class analysis feature is available as a part of Amazon S3 (see Storage class analysis)
3.2.2.3. Differentiating Glacier and S3
One of the key differences between Amazon S3 and Amazon Glacier is the functionality of read operations. In Amazon S3, reads are “synchronous”, meaning an HTTP GET operation will immediately return an object with millisecond latency. In Amazon Glacier, read operations are “asynchronous”, meaning there are 2 steps to retrieve an object (or archive):
- Restore command is issued (where one of the previously mentioned retrieval methods is specified)
- An HTTP GET operation will only succeed after Glacier has restored the object to an online state.
3.2.2.4. Lifecycle policy structure
You can generate lifecycle policies from the Amazon S3 console or write them manually in XML or JSON. An XML file of a lifecycle policy consists of a set of rules with predefined actions that Amazon S3 can perform on objects in your bucket. Each rule consists of the following elements:
- A filter that identifies a subset of object the rule applies to, suchas a key name prefix, object tag, or a combination.
- A status of whether the rule is in effect.
- One or more lifecycle transitions or expirations actions to perform on filtered objects
<LifecycleConfiguration>
  <Rule>
    <ID>example-id</ID>
    <Filter>
       <Prefix>logs/</Prefix>
    </Filter>
    <Status>Enabled</Status>
    <Transition>
      <Days>30</Days>
      <StorageClass>STANDARD_IA</StorageClass>
    </Transition>
    <Transition>
      <Days>90</Days>
      <StorageClass>GLACIER</StorageClass>
    </Transition>
    <Expiration>
      <Days>365</Days>
    </Expiration>
  </Rule>
</LifecycleConfiguration>
You can apply lifecycle policies to a S3 bucket by using the AWS CLI, but you must first convert your XML code to JSON. Lifecycle policies also support specifying multiple rules, overlapping filters, tiering down storage classes, and version-enabled buckets.
3.2.2.4.1. Zero day lifecycle policies
Lifecycle policies are commonly used across an entire Amazon S3 bucket to transition objects based on age, but there may be scenarios in which you might want to transition single or multiple objects to Glacier based on workflow operations or other status changes. Currently, an API call does not exist that moves a single object of a certain age to Amazon Glacier, but you can achieve this by using tags.
You can write a zero-day lifecycle policy with a tag filter that moves only a single object or a subset of objects to Glacier based on the tag value in the lifecycle policy. Only the objects that match the tag filter in your policy are moved on that day.
<LifecycleConfiguration>
  <Rule>
    <Filter>
       <Tag>
        <Key>flaming</Key>
        <Value>cars</Value>
       </Tag>
    </Filter>
    <Transition>
      <Days></Days>
      <StorageClass>GLACIER</StorageClass>
    </Transition>
  </Rule>
</LifecycleConfiguration>
3.2.2.5. Creating a Lifecycle policy
The simplest method for creating a lifecycle policy is to use the Amazon S3 console. Use this console to:
- Configure your prefix or tag filter.
- Configure the transition of data to S3-Standard-IA or Amazon Glacier.
- Define when objects within Amazon S3 expire.
After saving the rule, it is applied to the objects specified in the lifecycle policy. You also can set lifecycle configuration on a bucket programmatically by using AWS SDKs or the AWS CLI.
3.2.2.6. Glacier backup SW integration
A widely adopted use-case for Glacier storage is backup. Several popular backup SW solutions and storage gateway products have built-in integration with S3 and Glacier and their lifecycle capabilities. For example, Commvault, an enterprise-grade backup SW solution, can be featured in a hybrid model in which files are archived and analyzed onsite. However, the metadata from those files are stored in S3. Commvault natively talks to S3, which simplifies moving data into AWS. From there, lifecycle policies move data into Amazon Glacier. Commvault also supports the Amazon Glacier-native API, which could be enabled for customers wishing to utilize Vault Lock compliance capabilities.
In addition to Commvault, there are several ISVs that support integration with Glacier including Veritas NetBackup, Arq Backup, Cloudberry, Synology, Qnap, Duplicati, Ingenious, Rubrik, Cohesity, Vembu, and Retrospect.
3.2.3. Amazon Glacier durability and security
3.2.3.1. Durability with traditional storage
In a common storage architecture, we can have a single data center with RAID arrays. This setup provides a minimum level of data protection but leaves your data in a highly vulnerable position. The lack of geographic redundancy exposes your data to concurrent failures that could be caused by natural or man-made catastrophic events.
To rectify this scenario, an additional DR site is necessary in a different geographic region, which would double your data storage costs and the effort to maintain the environment. An additional DR site dos provide additional durability, but the data may not be synchcronously redundant.
AWS uses the Markov model to calculate the 11 9s of durability that Glacier and S3 are designed to provide. In general, a well-administered single-datacenter solution that supports multiple concurrent failures using a single copy of tape can deliver 4 9s of durability. Furthermore, a multiple-data center solution with 2 copies of tape in separate geographic regions can deliver 5-6 9s of durability.
3.2.3.2. Amazon Glacier durability
With a single upload to Glacier, your objects are reliably stored across multiple AZs. This scenario provide tolerance against concurrent failures across disks, nodes, racks, networks, and WAN providers. In addition to Amazon’s default 3-AZ durability model, customers may optionally duplicate their data in another geographic region.
3.2.3.3. Amazon Glacier security
3.2.3.3.1. Encryption features
Data stored in Glacier is encrypted by default, and only vault owners have access to resources created on Glacier. Access to resources can be controlled via IAM policies or vault access policies.
Glacier automatically encrypts data at rest by using AES 256-bit encryption and supports SSL data transfers. Furthermore, if data that is uploaded into Glacier is already encrypted, that data is re-encrypted at rest automatically by default.
Objects that transition from S3 to Glacier also supports SSE-SE. Users can upload objects to SE with SSE and later transition them to Glacier. With SSE enabled, encryption is applied to objects in S3, objects transitioned to Glacier, and objects restored from Glacier to S3. If SSE is not enabled during upload, objects transitioned to Glacier are encrypted, but objects stored in S3 will not be encrypted.
3.2.3.3.2. Auditing and logging
With AWS CloudTrail logging enabled, API calls made to Amazon Glacier are tracked in log files that are stored to a specified S3 bucket. Using the information collected by CloudTrail, you can determine requests made to Glacier, the source IP of the request, the time of the request, and who made the request. By default, CloudTrail log files are encrypted, and you can define lifecycle rules to archive or delete log files automatically. You can also configure SNS notifications to alert you when new log files are generated if you must act quickly.
3.2.3.4. Vault Lock and Vault access policies
A Vault Lock policy specifies a retention requirement in days from the data of archive creation. Until the retention date has passed, the archive is locked against changes or deletion that functions like a WORM storage device. Vault Lick supports a Legal Hold, which is intented to support the extension of WORM for archives subject to an ongoing legal event. Locking a policy means that the policy becomes immutable or cannot be chaned, and Glacier enforces the compliance controls specified in the policy for the specified vault.
Amazon Vault Lock eliminates the need for customers to purchase expensive WORM storage drives that require periodic refreshes for record retention. Customers can now easily set up a Vault Lock policy with 7 years of record retention. Glacier enforces the retenton control that ensures that archives stored in the vault cannot be modified or deleted until the 7-year period expires.
3.2.3.5. Differentiating Vault Lock and Vault access policies
A Vault Lock policy is not the same as a Vault access policy. While both policies govern access to your vault, vault lock policies cannot be changed once locked, and that provides strong enforcement for compliance controls. In addition, only one Vault Lock policy may be created for a vault, and it lasts for the life of a vault.
For example, a vault lock policy can deny deleting archives from a vault for a time period to ensure records are retained in accordance with a law or regulation. In contrast, a vault access policy would be used to grant access to archives the are not compliance related and that are subject to frequent modification. Vault lock policies and vault access policies can be used together. For example, a vault lock policy could be created to deny deletes inside of a vault, while a vault access policy colud allow read only access to an auditor.
3.2.3.6. Vault Lock example
{
     "Version":"2012-10-17",
     "Statement":[
      {
         "Sid": "deny-based-on-archive-age",
         "Principal": "*",
         "Effect": "Deny",
         "Action": "glacier:DeleteArchive",
         "Resource": [
            "arn:aws:glacier:us-west-2:123456789012:vaults/examplevault"
         ],
         "Condition": {
             "NumericLessThan" : {
                  "glacier:ArchiveAgeInDays" : "365"
             }
         }
      }
   ]
}
Shown here is an example if a Vault policy that is being initiated on a vault named BusinessCritial. The “Effect” for the policy is set to “Deny”, which will affect any actions specified in the policy. The “Principal” designated the user or group that this policy applies to, which in this case is set to “Everyone”, which is denoted by the star symbol in quotes.
The DeleteArchive action is specified and a date condition specifies a range of 365 days or fewer for archives in the BusinessCritical vault. This means that the vault policy denies anyone who attempsts to delete archives that are less than 365 days old. Glacier compares the archive creation date and the current date to determine the archive age. If an archive has a calculated age of less than 1 year, any detele request attempt will be declined. Note that if you are uploading older datasets, they will adopt a new date-created when they are uploaded. Therefore, your Vaul Lock retention policy should be adjusted accordingly.
3.2.3.7. Two-step process
Because locking a vault is immutable and cannot be altered once a vault is locked, it is important to understand the two-step locking process. To lock a vault, follow these steps:
- Initiate the lock by attaching a Vault Lock policy to your vault, which sets the lock to an in progress state and generates a lock ID.
- Use the lock ID to complte the process before the lock ID’s 24-hour expiration.
When you select the InitiateVault Lock operation, the vault locking process begins ans allows you to work in test mode. The test mode enables you to test the effectiveness of your vault lock policy. The unique lock ID that is generated expires after 24 hours, which gives ample time for testing. If you are not satisfied with the policy, you can use ``AbortVaultLock``operation to delete an in progress policy or modify your policy before locking it down.
After you have thoroughly tested your Vault Lock policy, you can complete the vault lock by using the CompleteVaultLock operation. To perform the final commit on the vault, supply the most recent lock ID. After the CompleteVaultLock operation is run, no changes can be made to the vault lock policy.
3.2.3.8. Vault tags
You can assign tags to your Glacier vaults for easier cost and resource management. Tags are key-value pairs that you associate with your vaults. By assigning tags, you can manage vault resources and organize data, which is useful when constructing AWS reports to determine usage and costs. Create a tag by defining a key and value that can be customized to meet your needs. For example, you can create a set of tags that defines the owner, purpose, and environment for the vaults you create.
The maximum number of tags that you can assign to a vault is 50. Keys and vaules are case-sensitive. Note that these tags are applied to the Amazon Glacier Vault resource, not to individual archives like Amazon S3 object tags.
You can also use a Legal Hold tag as a condition in Vault Lock policy statements. Suppose that you have a time-based retention rule that an archive can only be deleted if it is less than a 1 year old. At the same time, suppose that you need to place a legal hold on your archives to prevent deletion or modification for an indefinite duration during a legal investigation. In this case, the legal hold takes precedence over the time-based retention rule specified in the Vault Lock policy. To accomodate this scenario, the following example policy has 1 statement with 2 conditions: The first condition will DENY deletion of archives that are less than 365 days old and the second condition will also DENY deletion of archives as long as the vault level hold tag is set to true.
{
     "Version":"2012-10-17",
     "Statement":[
      {
        "Sid": "no-one-can-delete-any-archive-from-vault",
        "Principal": "*",
        "Effect": "Deny",
        "Action": [
          "glacier:DeleteArchive"
        ],
        "Resource": [
          "arn:aws:glacier:us-west-2:123456789012:vaults/examplevault"
        ],
        "Condition": {
          "NumericLessThan": {
            "glacier:ArchiveAgeInDays": "365"
          },
          "StringLike": {
            "glacier:ResourceTag/LegalHold": [
              "true",
              ""
            ]
          }
        }
      }
   ]
}
A vault lock policy written in this manner prevents deletion or modification of archives in a vault for up to 1 year or until the legal hold tag value is set to false.
3.2.4. Optimizing costs on Amazon Glacier
3.2.4.1. Amazon Glacier pricing model
Amazon Glacier’s best feature is its ultra-low pricing, its key feature is the ability to store more data for less. In addition to storage costs, Amazon Glacier pricing is segmented into several pricing categories:
- Retrieval pricing. Volume-based and transaction-based fees that are based on expedited, standard, or bulk retrieval methods.
- Request pricing, which is based on the number of archive upload requests or lifecycle transitions from S3.
- Data transfer pricing, which is based on data transferred out of Amazon Glacier.
- Amazon Glacier Select pricing, which is charged separately by Amazon and is based on the amount of data scanned and number of Glacier Select requests.
3.2.4.2. Object targeting best practices
When transitioning to Amazon Glacier, it is advised to target average object sizes because there is a 32-KB overhead cahrge for each object stored on Glacier regardless of object size. In practice, this means that if the objects in your Glacier vault have an average object size of 32 KB, you would in effect be paying twice: once for the 32-KB overhead charge and also for the standard storage charge. Therefore, it is good practice to target objects that are 1 MB and above for transitioning to Glacier. If your workloads tend to store small files, it is recommended to containerize small files using TAR, ZIP, or similar tools.
Glacier is designed for long-lived data and imposes a 90-day minimum retention requirement as well as upload fees that are 10 times those of S3. These fees and limitations are typically not material costs for large-scale long-term archival. But customers with very active small-file workloads may find S3 or S3-IA is a more appropriate storage solution.
3.2.5. Ingesting data into Amazon Glacier
Unlike S3, the Amazon Glacier console does not provide an interface to upload archives directly from the AWS console. Use either lifecycle policies or the Amazon Glacier API, or direct uploads through 3rd party tools.
3.2.5.1. Network ingestion options
In addition to uploading data via the Amazon Glacier API, data can be moved into Glacier by implementing a SSL tunnel over the public Internet using several 3rd party options. You can also transfer data using AWS Direct Connect. AWS Direct Connect is a high-performace dedicated bandwidth solution that connects on-premises sites directly to AWS. AWS Direct Connect is particularly useful in hybrid environments like on-premises video editing suites where I/O traffic is relatively high and there is a strong sensitivity to having consistent retrieval latency.
3.2.5.2. AWS Snow family
The AWS Snow family is a collection of data transfer appliances that accelerates the transfer of large amounts of data in an out of AWS without using the Internet. Each Snowball appliance can transfer data tranfer than Internet speeds. The transfer is done by shipping the appliance directly to customers by using a regional carrier. The appliances are rugged shipping containers with tamper-proof electronic ink labels.
With AWS Snowball, you can move batches of data between your on-premises data storage locations and S3. AWS Snowball has an 80-TB model available in all regions, and a 50-TB model available only in US. Snowball devices are encrypted at rest and are physically secured while in transit. Data transers are performed via the downloadable AWS Snowball client, or programmatically using the Amazon S3 REST API. It has 10G network interfaces (RJ45 and SFP+, fiber/copper).
Snowball Edge is a more advanced appliance in the Snow family that comes with 100 TB of local storage with built-in local compute that is equivalent to an m4.4xlarge instance. Snowball Edge appliances can run AWS Lambda functions or perform local processing on the data while being shuttled between locations. AWS Snowball Edge has multiple interfaces that support S3, HDFS, and NFS endpoints that simplify moving your data to AWS. It has 10GBase-T, 10/25Gb SFP28, and 40Gb QSFP+ network interfaces.
Although an AWS Snowball device costs less than AWS Snowball Edge, it cannot store 80 TB of data in one device. Take note that the storage capacity is different from the usable capacity for Snowball and Snowball Edge. Remember that an 80 TB Snowball appliance and 100 TB Snowball Edge appliance only have 72 TB and 83 TB of usable capacity respectively. Hence, it would be costly if you use two Snowball devices compared to using just one AWS Snowball Edge device.
Snowball Edge devices have three options for device configurations – storage optimized, compute optimized, and with GPU. When this guide refers to Snowball Edge devices, it’s referring to all options of the device. Whenever specific information applies only to one or more optional configurations of devices, like how the Snowball Edge with GPU has an on-board GPU, it will be called out.
If your data migration needs are on an exabyte-scale, AWS Snowmobile is available as the transfer device for the large amounts of data. AWS Snowmobile is a 45-foot long rugged shipping container that has an internal capacity of 100 PB and 1 TB/s networking. AWS Snowmobile is designed to shuttle 100 PB of data in under a month and connects to NFS endpoints.
Snow family appliances have many uses cases, including: Cloud migration, Disaster Recovery, Data Center decommissioning, and content distribution.
3.2.5.3. AWS Storage Gateway
AWS Storage Gateway is a hybrid storage service that enables your on-premises applications to seamlessly use AWS Cloud storage through conventional interfaces such as NFS, iSCSI or VTL. You can use this service for buckup and archiving, DR, cloud bursting, storage tiering, and migration. Your applications connect to the service through a gateway appliance by using standard storage protocols, such as NFS and iSCSI. The Storage Gateway connects to S3 and Glacier on the back-end, providing storage for files, volumes, and virtual tapes in AWS. The service includes a highly optimized data transfer mechanism, with bandwidth management, automated network resilience, and efficient data transfer. It also provides a local cache for low-latency on-premises access to your most active data.
AWS Storage Gateway integrates seamlessly with Glacier through several pathways. Data can be written to an NFS mount point in S3, which can be tiered to Glacier or kept in S3 Standard or Standard-IA. For backup applications that are not already integrated with the Amazon S3 API, use the Virtual Tape Library Gateway mode, which mimics an Oracle/StorageTk L700 LTO tape library. The virtual tape shelf feature, will ‘eject’ a virtual tape from S3 into Glacier storage.
For Volume and Tape Gateway configurations, the customers’ files are stored in a gateway-proprietary format, thus egress must always be back through the Gateway. For customers wishing to use AWS Storage Gateway as a migration tool, where files can subsequently be accessed via the S3 API in native format, the AWS File Gateway solution supports this capability.
3.2.5.4. Migrating with AWS Storage Gateway and Snowball
AWS Storage Gateway can plug into an existing on-premises environment and combine with AWS Snowball to perform data migrations. Suppose you have a customer who is archiving data to an LTO tape and accessing the data using NAS devices. The customer can migrate their data from the NAS devices to AWS by connecting them to multiple AWS Snowball devices.
When the data transfer is complete, the AWS Snowball devices are shipped to AWS where the data is copied in S3 Standard. AWS Lambda functions can be run against the data to verify that the data that was transferred to each AWS Snowball device matches the data that was transferred from on-premises. After verification, an AWS Storage Gateway is deployed at the data center. It is mounted to the S3 bucket via AWS Direct Connect through NFS and data is written back to the on-premise file servers.
Migrating to AWS enables real-time access because all data is accessible via AWS Storage Gateway or S3 Standard. You can then transition the data to Standard-IA or Glacier using lifecycle policies.
There are 10 steps to replace tape backup with AWS Storage Gateway:
- Go to AWS console to select type of Storage Gateway and hypervisor.
- Deploy new Tape Gateway appliance in your environment.
- Provision local disk for cache and upload buffer. The minimum required space for these 2 disks is 150 GiB.
- Connect and activate your Tape Gateway appliance.
- Create virtual tapes in seconds.
- Connect Tape Gateway to backup application.
- Import new tapes into backup application.
- Begin backup jobs.
- Archive tapes for storage on Amazon Glacier. In the backup applications you need to eject (also called export by some backup applications).
- Retrieve tape on gateway for recovery.
3.2.5.5. Multipart uploads
For large archives, you can use the multipart upload in Glacier-Native API to increase reliability in throughput. It allows uploading or copying objects that are 5 GB in size or greater.
With multipart uploads, a single object becomes a set of parts. Each part is a contiguous portion of the object’s data. You can upload these object parts independently and in any order. If transmission of any part fails, you can retransmit that part without affecting other parts. After all parts of your object are uploaded, Glacier assembles these parts and creates the object. In general, when your object size reaches 100 MB, you should consider using multipart uploads instead of uploading the object in a single operation. Multipart uploading is a three-step process:
- You initiate the upload:
InitiateMultipartUpload(partSize) -> uploadId - Upload the object parts:
UploadPart(uploadId,data) - Complete the multipart upload:
CompleteMultipartUpload(uploadId) -> archiveId
3.2.6. Data access on Amazon Glacier
3.2.6.1. Amazon Glacier retrieval
3.2.6.1.1. Features
Amazon Glacier provides 3 retrieval methods that may be specified when retrieving Glacier archives.
**Expedited* retrievals are often used in situations when access to an archive is urgent. You can retrieve a single file from an archive from 1 to 5 minutes.
Expedited retrievals allow you to quickly access your data when occasional urgent requests for a subset of archives are required. For all but the largest archives (250 MB+), data accessed using Expedited retrievals are typically made available within 1?5 minutes. Provisioned Capacity ensures that retrieval capacity for Expedited retrievals is available when you need it.
Standard retrievals grants access to archives in about 3-5 hours, which is a good fit for DR situations or when thre is not an immediate need for an archive.
Bulk retrievals grant access to archives from 5 to 12 hours. This tier is primarily for batch processing workloads, such as log files analysis, video transcoding, or large data lakes that require background processing. You can use bulk retrievals to comb through data slowly and pull back PBs of data at a low cost that can be processed by elastic compute or sport instances.
To make an Expedited, Standard, or Bulk retrieval, set the Tier parameter in the Initiate Job (POST jobs) REST API request to the option you want, or the equivalent in the AWS CLI or AWS SDKs. If you have purchased provisioned capacity, then all expedited retrievals are automatically served through your provisioned capacity.
3.2.6.1.2. Performance
Glacier reads are asynchronous: first, the appliation issues a restore job request and specifies one of 3 retrieval methods to be used, then after the specified time period has passed and file is restored, then the application can issue a GET to retrieve the file.
For expedited retrievals, the 1-5-minute restore time is guidance for objects that are up to 250 MB in size. However, larger objects can take longer to restore. For example, a 1-GB object can be restored in 10 minutes or less, given optimal network conditions. Like S3, Glacier’s HTTP transaction layer is designed to push back in the event of high loading. If your workload requires guaranteed responsiveness and HA for expedited retrievals, Amazon Glacier’s Provisioned Capacity Units are an optional solution.
For Standard retrievals, restore times will be 3-5 hours, even for a PB of data or more. And the bulk retrievals, this option can be used to restore multiple PBs of data in less than 12 hours.
3.2.6.2. Amazon Glacier restore options
When an archive is restored through the Glacier-Native API, you are given 24 hours to get the archive from staging storage before you must issue a new restore job. However, via S3-restore, an arbitrary TTL may be specified in days, where a temporary copy of the asset is retained in the S3 bucket in the Reduced Redundancy Storage class. In the case of S3 restores, customers pay for the incremental S3 storage.
If you must restore a PB-scale workload, contact your AWS account team to explore some helpful options. Scripts are available to spread bulk requests over a specified duration to ensure that you are using bulk retrievals in the most efficient manner. Bulk retrievals are often used in datasets that will be processed, so it is important to ensure that your data is being restored at the right speed for the application that will be processing the data.
3.2.6.3. Provisioned capacity units
Provisioned capacity units (PCUs) are a way to reserve I/O capacity for Glacier expedited retrievals and guarantees that restore requests will not be throttled. Performance guidance for PCUs is that 1 PCU can deliver up to 3 expedited retrievals and up to 250 MB in 5 minutes, and provide up to 150 MB/s of retrieval throughput for a best-case sequential read. Note that there is no maximum file size restriction for Glacier Expedited retrievals. A large file, however, will take somewhat longer to restore. For example, most 25 GB archive retrievals should complete in under 10 minutes.
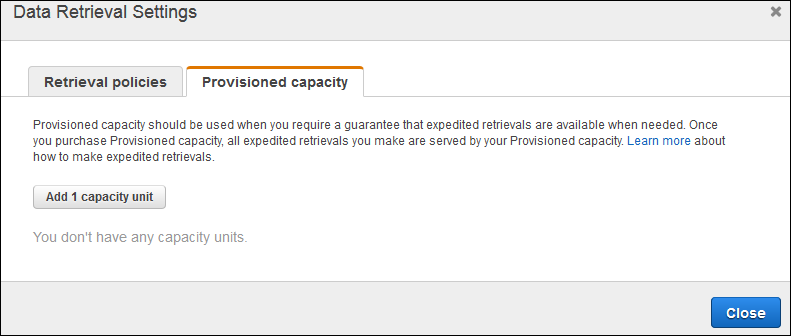
Data retrieval settings
Without PCUs, expedited retrieval requests are accepted only if capacity is available at the time the request is made. It’s possible that your workload will see performance variability or API-level pushback. PCUs are not guaranteed to improve Glacier performance, but PCUs will reduce variability, and may improve performance if the system is under heavy load. It’s important to note, however, that when you enable provisioned capacity units in Glacier, all I/O retrieval requests are routed through provisioned units. None of your Glacier I/O will go through the traditional I/O pool. Consequently you must ensure that you have provisioned enough units to handle your workload peaks.
Each provisioned capacity unit can generally be modeled as providing the equivalent to two LTO6 tape drives. If you are using Glacier as part of an active workflow and you expect deterministic retrieval performance, consider using provisioned capacity units to meet your performance needs.
3.2.6.4. Glacier Select
Glacier Select allows you to directly filter delimited Glacier objects using simple SQL expressions without SQL having to retrieve the full object. Glacier Select allows tou to accelerate bulk ad hoc analytics while reducing overall cost.
Glacier Select operates like a GET request and integrates with the Amazon Glacier SDK and AWS CLI. Glacier Select is also available as an added option in the S3 restore API command.
3.2.6.4.1. Use cases
Glacier Select is a suitable solution for pattern matching, auditing, big data integration, and many other use cases.
To use Amazon Glacier Select, archive objects that are queried must be formatted as uncompressed delimited files. You must have a S3 bucket with write permissions that resides in the same region as your Glacier vault. Finally, you must have permissions to call the Get Job Output command from a command line.
3.2.6.4.2. Query structure
An Amazon Glacier Select request is similar to a restore request. The key difference is that there are SELECT statements inside the expression inside the expression, and a derivative object produced. The restore request must specify an Glacier Select request and also choose the restore option of standard, expedited, or bulk. The query returns results based on the timeframe of the specified retrieval tier.
You can add a description and specify parameters. If your query has header information, you can also specify the input serialization of the objects. Use the expression taf to define your SELECT statement and the OutputLocation tag to specify the bucket location for the results. For example, the following JSON file runs the query SELECT * FROM object. Then, it sends the query results to the S3 location awsexamplebucket/outputJob:
{
    "Type": "SELECT",
    "Tier": "Expedited",
    "Description": "This is a description",
    "SelectParameters": {
        "InputSerialization": {
            "CSV": {
                "FileHeaderInfo": "USE"
            }
        },
        "ExpressionType": "SQL",
        "Expression": "SELECT * FROM object",
        "OutputSerialization": {
            "CSV": {}
        }
    },
    "OutputLocation": {
        "S3": {
            "BucketName": "awsexamplebucket",
            "Prefix": "outputJob",
            "StorageClass": "STANDARD"
        }
    }
}
3.2.6.4.3. SQL expressions supported by Amazon Glacier
With Glacier Select, you can specify all items in an expression with SELECT *, or specify columns using a positional header and the WHERE filter. You can also specify name headers as well. Use these SQL filters to retrieve only a portion of an object.
Row-level SQL expressions are support such as +,</>, LIKE, AND/OR, ISNULL, STRING, CASE, COUNT, MAX. For full SQL capabilities including joins and windowing, tools such as Amazon Athena should be subsequently employed.
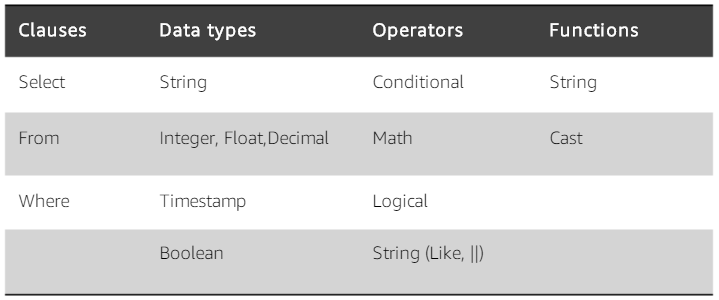
SQL expressions supported by Amazon Glacier
SQL Reference for Amazon S3 Select and S3 Glacier Select
Amazon S3 Glacier API Permissions: Actions, Resources, and Conditions Reference
3.2.6.4.4. How Amazon Glacier Select works
Glacier Select works when initiate a request job with the SQL parameters you specify. When the job request is received, Glacier returns an acknowledgment ID 200 to indicate that the request was received successfully. Glacier then processes the request ad writes the output to a S3 bucket with the specified prefix in the job request. SNS sends a notification to alert you when the job is complete.

How Amazon Glacier Select works
3.2.6.4.5. Pricing model
Glacier Select pricing depends on the retrieval option you specify in your retrieval request job. You can specify standard, expedited, or bulk in your expression. The pricing for Glacier Select falls into 3 categories for each retrieval option: Data Scanned, Data Returned, and Request.
Data Scanned is the size of the object that the SQL statement is run against. Data Returned is the data that returns as the result of your SQL query. Request is based on the initiation of the retrieval request.
3.3. Amazon EBS
3.3.1. Overview
EBS is block storage as a service. With an API call, you create an EBS volume, which is a configurable amount of raw block storage with configurable performance characteristics. With another API call, you can attacj a volume to an EC2 instance when you need access to that data. Access to the volume os over the network. Once attached, you can create a file system on top of a volume, run a database on it, or use it in any other way you would use block storage.
An EBS volume is not a single physical disk. It is a logical volume. EBS is a distributed system an each EBS volume is made up of multiple, physical devices. By distributing a volume across many devices EBS provides added performance and durability that you can’t get from a single disk device.
EBS volumes are created in a specific AZ, and can then be attached to any instances in that same AZ. To make a volume available outside of the AZ, you can create a snapshot and restore that snapshot to a new volume anywhere in that region.
Data on an EBS volume persists independently from the life of an EC2 instance. As a result, you can detach your volume from one instance and attach it to another instance in the same AZ as the volume. If an EC2 instance fails, EBS storage persists independently from the EC2 instance. Because the system has failed, and has not been terminated by calling an PI, the volume is still available. In this case, you can re-attach the EBS volume to a new EC2 instance.
An EBS volume can be attached to only one instance at a time, but many volumes can attach to a single instance. For example, you might separate boot volume from application-specific data volumes.
EBS is designed to give a high level of volume availability and durability. Each volume is designed for five 9s of service availability. That’s an average down time of about 5 minutes per year. For durability, the Annualized Failure Rate (AFR) is between 0.1% and 0.2%, nearly 20 times more reliable than a typical HDD at 4% AFR. To recover from a volume failure, you can use EBS to create snapshots of volumes, which are point-in-time copies of your data that is stored in S3 buckets.
3.3.1.1. Block storage offerings
AWS addresses the block storage market in 3 categories to align with different customer workloads:
- EC2 instance store provides SSD and HDD-based local instance store that targets high IOPS workloads that require low microsecond latency.
- EBS SSD storage offers General Purpose (gp2) and Provisioned IOPS (io1) volume types.
- EBS HDD storage offers Throughput Optimized (st1) and Cold HDD (sc1) volume types.
An instance store provides temporary block-level storage for your instance. This storage is located on disks that are physically attached to the host computer. Instance store is ideal for temporary storage of information that changes frequently, such as buffers, caches, scratch data, an other temporary content, or for data that is replicated across a fleet of instances, such as load-balanced pool of web servers.
An instance store consists of one or more instance store volumes exposed as block devices. The size of an instance store and the number of devices available varies by instance type. Although an instance store is dedicated to a particular instance, the disk subsystem is shared among instances on a host computer.
The EC2 instance and EBS have some similarities:
- Both are presented as block storage to EC2.
- Both are available as either SSD or HDD, depending on the EC2 instance type.
Their differences are:
- EC2 instance store is ephemeral. Data stored on the instance store does not persist beyond the life of the EC2 instance, consider it as being temporary storage.
- By default, data on EC2 instance store volumes is not replicated as a part of the EC2 service. However, you can set up replication yourself by setting up a RAID volume on the instance or replicating that data to another EC2 instance.
- Snapshots of an EC2 instance store volume are not supported, so you would have to implement your own mechanism to back up data stored on an instance store volume.
3.3.1.2. Use Cases
Relational Databases such as Orable, Microsoft SQL Server, MySQL, and PostgreSQL are widely deployed on EBS.
EBS meets the diverse needs of reliable block storage to run mission-critical applications such as Oracle, SAP, Microsoft Exchange, and Microsoft SharePoint.
EBS enables your organization to be more agile and responsive to customer needs. Provision, duplicate, scale, or archive your development, test, and production environment with a few clicks.
EBS volumes provide the consistent and low-latency performance your application needs when running NoSQL databases.
Business Continuity. Minimize data loss and recovery time by regularly backing up your data and log files across different geographic regions. Copy AMIs and EBS snapshots to deploy applications in new AWS Regions.
AWS re:Invent 2018: [REPEAT 1] Deep Dive on Amazon Elastic Block Storage (Amazon EBS) (STG310-R1)
3.3.2. Types of Amazon EBS volumes
3.3.2.1. Comparison of EBS volume types
EBS provides the following volume types, which differ in performance characteristics and price, so that you can tailor your storage performance and cost to the needs of your applications. The volume types fall into 2 categories: Solid state drives and Hard disk drives.
Solid state drive, or SSD-backed volumes are optimized for transactional workloads that involve frequent read/write operations with small size and random I/O. For SSD-backed volumes, the dominant performance attribute is I/O operations per second, or IOPS. These volumes provide low latency.
Hard disk drive, or HDD-backed volumes are optimized for large streaming workloads where throughput (measured in MiB/s) is a better performance measure than IOPS. These volumes work best when the workload is sequential. For example, back up operations and writing SQL transaction log files. The more sequential a workload is, the less time spent in read operations. Therefore, the faster disk response leads to higher throughput rates.
There are 2 types of SSD-backed volumes: General Purpose (gp2) and Provisioned IOPS (io1). There are 2 types of HDD-backed volumes: Throughput Optimized (st1) and Cold HDD (sc1). This table describes and compares the 4 volume types.

The General Purpose SSD volume can handle most workloads, such as boot volumes, virtual machines, interactive applications, and development environments. The Provisiones IOPS SSD volume can handle critical business applications that require nearly continuous IOPS performance. This type of volume is used for large database workloads.
An io1 volume can range in size from 4 GiB to 16 TiB. You can provision from 100 IOPS up to 64,000 IOPS per volume on Nitro system instance families and up to 32,000 on other instance families. The maximum ratio of provisioned IOPS to requested volume size (in GiB) is 50:1.
For example, a 100 GiB volume can be provisioned with up to 5,000 IOPS. On a supported instance type, any volume 1,280 GiB in size or greater allows provisioning up to the 64,000 IOPS maximum (50 × 1,280 GiB = 64,000).

An io1 volume provisioned with up to 32,000 IOPS supports a maximum I/O size of 256 KiB and yields as much as 500 MiB/s of throughput. With the I/O size at the maximum, peak throughput is reached at 2,000 IOPS. A volume provisioned with more than 32,000 IOPS (up to the cap of 64,000 IOPS) supports a maximum I/O size of 16 KiB and yields as much as 1,000 MiB/s of throughput.
Therefore, for instance, a 10 GiB volume can be provisioned with up to 500 IOPS. Any volume 640 GiB in size or greater allows provisioning up to a maximum of 32,000 IOPS (50 × 640 GiB = 32,000).
The Throughput Optimized HDD volume can handle streaming workloads that require consistent and fast throughput at a low price. For example, big data, data warehouses, and log processing. The Colod HDD volume can handle throughput-oriented storage for large amounts of data that are infrequently accessed. Use this type of volume for scenarios in which achieving the lowest storage cost is important.
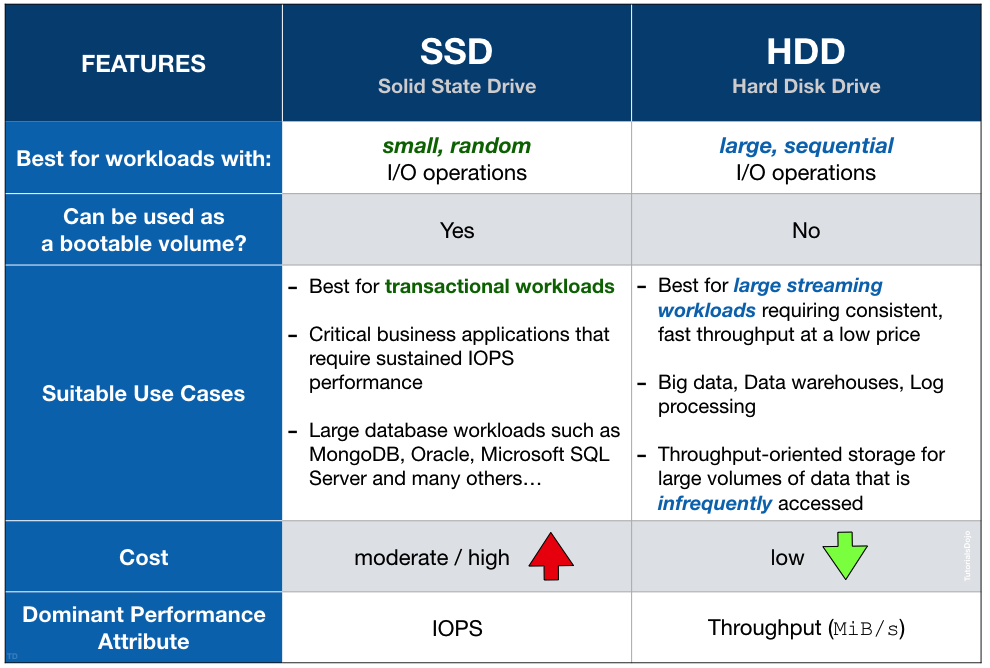
3.3.2.2. Choosing an EBS volume type
How do you determine which volume type to use? Begin be asking: Which storage best aligns with the performance and cost requirements of my applications? Each has benefits and limitations that work with or against certain workloads.
What is more important IOPS or Throughput?
If IOPS is more important, how many IOPS do you need?
If the answer is more than 80000, choose an EC2 instance store.
If you need 80000 or fewer, what are your latency requirements?
If your latency is in microseconds, the choice is an EC2 instance store. EC2 instance stores provide the lowest latency that you can achieve.
If your latency is in the single-digit millisecond category, decide what’s more important? Cost or performance?
- If cost is more important, choose General purpose (gp2).
- If performance is the main driver for your workload, choose SSD volume type, Provisioned IOPS (io1). Compared to gp2, io1 provides more consistent latency (less jitter) and an order of magnitude more of IOPS consistency.
If Throughput is the defining characteristic of your workload, Waht type of I/O do you have? Small, random I/O or large, sequential I/O?
If you have small random I/O, re-evaluate the SSD categories.
If you have large sequential I/O, what is your aggregate throughput?
If you need more than 1750-MB/s throughput, consider D2 or H1 optimized instance types. D2 is dense storage instance type, which enables you to take advantage of the low cost, high disk throughput, and high sequential I/O access rates. D2 has up to 48 TB of local spinning hard disk, and it can do upwards of 3 GB/s of sequential throughput. H1 instances are storage-optimized instances, which are designed for applications that require low-cost, high-disk throughput, and high sequential disk I/O access to large datasets.
If your throughput requirement is less than 1750 MB/s, Which is more important? Cost or performance?
- If it’s performance, consider the HDD volume type throughput optimied HDD (st1).
- If the most important factor is cost, choose the Cold HDD (sc1) volume.
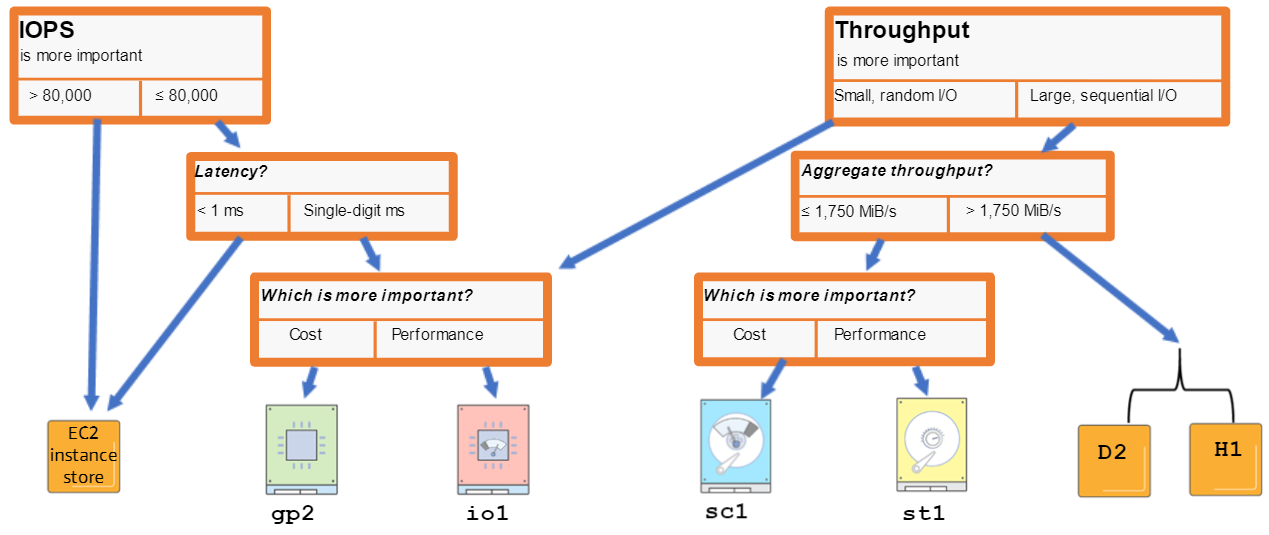
When you are not sure what your workload is, choose General Purpose SSD (gp2) as it satisfies almost all workloads. However, this volume type works well for boot volumes, low-latency applications, and the bursty databases where the data transmission is interrupted at intervals.
3.3.2.3. EBS-Optimized instances
A non-EBS optimized instances has a shared network pipe. As a result, Amazon EBS traffic is on the same pipe as the network traffic to other EC2 instances, AWS services, such as Amazon S3, and the Internet. A shared network pipe is used because EBS storage is network-attaches storage and not attached directly to the EBS instance. The sharing of network traffic can caouse increased I/O latency to your EBS volumes.
EBS-optimized instances have dedicated network bandwidth for Amazon EBS i/O that is not shared. This optimization provides the best performance for your EBS volumes by minimizing contention between EBS i/O and other traffic from your instance. The size of an EBS-optimized instance, for example 2xlarge or 16xlarge, defines the amount of dedicated network bandwidth that is allocated yo your instance for the attached EBS volumes.
It is important to choose the right size EC2 that can support the bandwidth to your EBS volume. Choosing the right size helps you achieve the required IOPS and throughput.
EBS-optimized instances deliver dedicated bandwidth to EBS, with options between 425 Mbps and 14000 Mbps, depending on the instance type that you use. When attached to and EBS-optimized instance, General Purpose SSD (gp2) volumes are designed to deliver within 10% of their baseline and burst performance 99.9% of the time in a given year. Both Throughput Optimized HDD (st1) and Cold HDD (sc1) are designed for performance consistency of 90% of burst throughtput 99% of the time.
3.3.2.4. EBS-Optimized burst
C5 instance types provide EBS-optimized burst. The C5 instance types can support maximum performance for 30 minutes at least once every 24 hours. For example, c5.large instances can deliver 275 MB/s for 30 minutes at least once every 24 hours. If you have a workload that requires sustained maximum performance for longer than 30 minutes, choose an instance type based on the baseline performancee listed for each C5 instance.
3.3.3. Managing Amazon EBS snapshots
An EBS snapshot is a point-in-time backup copy of an EBS volume that is stored in S3. S3 is a regional service that is not tied to a specific AZ. It is designed for 11 9s of durability, which is several orders of magnitude greater than the volume itself.
Snapshots are incremental backups, which means that only the blocks on the device that have changed after your most recent snapshot are saved. The incremental backups minimize the time required to create the snapshot and save on storage costs by not duplicating data. When you delete a snapshot, only the data that’s unique to that snapshot is removed. Each snapshot contains all the information needed to restore your data (from the moment when the snapshot was taken) to a new EBS volume.
When you create an EBS volume from a snapshot, the new volume begins as an exact replica of the original volume that was used to create the snapshot. The replicated volume loads data lazily, that is, loads data when it’s needed, in the background so that you can begin using it immediately.
EBS snapshots occur asynchronously. This means that the point-in-time snapshot is created immediately, but the status of the snapshot is pending until the snapshot is complete (when all of the modified blocks have been transferred to Amazon S3), which can take several hours for large initial snapshots or subsequent snapshots where many blocks have changed. While it is completing, an in-progress snapshot is not affected by ongoing reads and writes to the volume hence, you can still use the volume.
Snapshots with AWS Marketplace product codes can’t be made public.
3.3.3.1. How does a snapshot work?
When you execute the first snapshot, all blocks on the volume that have been modified (let’s call them A,B,C) are marked as a snapshot copy to S3. Empty blocks are not part of the snapshot. The volume is useable again as soon as the CreateSnapshot API returns successfully, usually within a few seconds. You do not have to wait for the actual data transfer to complete before using the volume.
Snapshots are incremental backups so the second snapshot contains only new blocks or blocks that were modified since the first snapshot. For snapshot 2, block C has been modified to C1. A second snapshot is taken. Because the snapshot is incremental, C1 is the only block saved to the second snapshot. None of the data from the snapshot 1 is included in the new snapshot. Snapshot 2 contains only references to snapshot 1 for any unchanged data.
Before snapshot 3 is taken, two new blocks, D and E, are added, and the file system has deleted the file that contained block B. From a block perspective, block B was modified. Snapshot 3 contains any new or changed data since snapshot 2, but the new snapshot only references the blocks in snapshots 1 and 2 that are unchanged.
If you delete the first 2 snapshots, the deletion process is designed so that you retain only the most recent snapshot to restore the volume. The state of the original B block is now gone and A is still restorable from the latest snapshot even though it was not part of the original change set.
Active snapshots contain all the necessary information to restore the volume to the instant at which that snapshot was taken. When you create a new volume from a snapshot, data is lazily loaded in the background so that the volume is immediately available. You don’t have to wait for all the data to be transferred to the new volume. If you access a piece of data that hasn’t been loaded to the volume yet, that piece immediately moves to the front of the queue of data that flows from the snapshot data in S3 to your new volume.
3.3.3.2. Creating snapshots
- You can use snapshots as an easy way to back up and share data on EBS volumes among multiple AZs within the same region.
- Another possible scenario is that you want to use snapshots in a different region or share with a different account. You can use copy-snapshot API operation, or the snapshot copy action from the AWS management console to copu snapshots to different regions. You can share sanpshots by modifying the permissions of the snapshot and granting different AWS accounts permission to use that snapshot. From that snapshot, others can create EBS volumes and get access to a copy of the snapshot data. The copy of snapshots to a different regions can be part of your disaster recovery strategy.
3.3.3.3. Snapshots and RAID
When the instance is using a RAID configuration, the snapshot process is different. You should stop all I/O activity of the volumes before creating a snapshot:
- Stop all applications from writing to the RAID array.
- Flush all caches to the disk.
- Confirm that the associated EC2 instance is no longer writing to the RAID array by taking actions such as freezing the file system, unmounting the RAID array, or even shutting down the EC2 instance.
- After taking steps to halt all disk-related activity to the RAID array, take a snapshot of each EBS volume in the array.
When you take a snapshot of an attached Amazon EBS volume that is in use, the snapshot excludes data cached by applications or the operating system. For a single EBS volume, this is often not a problem. However, when cached data is excluded from snapshots of multiple EBS volumes in a RAID array, restoring the volumes from the snapshots can degrade the integrity of the array.
When creating snapshots of EBS volumes that are configured in a RAID array, it is critical that there is no data I/O to or from the volumes when the snapshots are created. RAID arrays introduce data interdependencies and a level of complexity not present in a single EBS volume configuration.
3.3.3.4. Amazon Data Lifecycle Manager (DLM)
When you must back up a large number of volumes or manage a large number of snapshots, you can use Amazon Data Lifecycle Manager (DLM). DLM automates the backup of EBS volumes and the retention of those backups for as long as needed. This feature uses policies to define backup schedules that specify when you want a snapshot to be taken and how often DLM creates the snapshots when you define the policies.
You also specify how many snapshots you want to retain, and Amazon DLM automatically manages the expiration of snapshots. This is an important feature if you need to retain snapshots for a certain period of time, or need to retain a certain number of snapshots for compliance and auditing reasons. Retention rules also help you to keep snapshot costs under control by removing snapshots that are no longer needed.
When you define a DLM policy, you specify volume tags to identify which EBS volumes should be backed up. This allows a single policy to be applied to multiple volumes. You can also use IAM to fully control access to DLM policies. There’s no additional cost to using DLM. You pay only for the cost of the snapshots.
An example of DLM policy that satisfies the customer requirement: All EC2 instance root volumes must be backed up once per day, and that backups should be retained for 7 days. It is necessary to define a data lifecycle policy by specifying the EBS volume type to use. In this example, the tag name is voltype with a value of root. As we want to take one snapshot per day, so you specify to take a snapshot every 24 hours at 0700 UTC. Then, you retain the latest 7 snapshots.
DLM enables you to take snapshots every 12 hours or every 24 hours. If you need to take snapshots more often than this, you can use multiple tags on the same volume. For example, suppose that you want to create a snapshot every 8 hours and retain 7 days of snapshots. You add 3 tags to your volume for backup. The tag key-value pairs can be anything that makes sense for your organization. you then define 3 separate policies, one for each tag, running once per day for each policy. You stagger the start time so that it is offset by 8 hours from the other policies.
Here are some considerations to take into account when using DLM for EBS snapshots:
- When specifying multiple tags in a policy, the policy applies to any of the tags specified. A snapshot is generated for each volume with a matching tag.
- You can use a volume tag in only one DLM policy. You cannot create a policy with a volume tag that has been already assigned to an existing policy.
- Snapshots are taken within one hour of the specified start time. The snapshot may not generally be taken exactly at the time specified in the policy.
- To improve the manageability of snapshots, DLM automatically applies AWS tags to each snapshot that is generates. Alternatively, you can specify custom tags to be applied to the snapshot.
3.3.3.5. Tagging EBS snapshots
AWS supports tagging both EBS volumes and snapshots during creation. Tagging snapshots during creation is an atomic operation, that is, the snapshot must be created and the tags must be applied for the successful creation of snapshots. This functionality facilitates the proper tracking of snapshots from the moment that they are created. It also means that any IAM policies that apply to snapshots tags are enforced immediately.
You can add up to 50 tags to your snapshot when it’s created. AWS provides resource-level permissions to control access to EBS snapshots through IAM policies. You can use tags to enforce tighter security policies. The CreateSnapshot, DeleteSnapshot, and ModifySnapshotAttribute are API operations that support IAM resource-level permissions.
The IAM policies give you precise control over access to resources. For example, you can require that a certain set of tags is applied when the snapshot is created, or you can restrict which IAM users can take snapshots on specific volumes. You can also control who can also control who can delete snapshots.
3.3.4. Managing Amazon EBS volumes
3.3.4.1. EBS volume management actions
The actions that you can perform on a volume are the following:
- Create: New EBS volumes are created from large amounts of available space. They can have a size from 1 GiB to TiB.
- Attach: An EBS volume can be attached to an instance. After attachment, it becomes visible to the operating system as a regular block device. Each EBS volume can be a single EC2 instance at a time.
- Create snapshot. Snapshots can be created from a volume at any time while the volume is in the in-use state.
- Detach. When the operating system no longer uses the volume, it can be detached from the instance. Data remains stored on the EBS volume, and the volume remains available for attachment to any other instance within the same AZ.
- Delete. When the volume and its contents are no longer needed, the EBS can be deleted.
3.3.4.2. Creating a volume
You can create an EBS volume and attach it to any EC2 instance within the same AZ. You can create an encrypted EBS volume, but you can attach an encrypted volume only to supported EC2 instance types. When a volume is created, its state is available. When the volume is attached to an instance, its state changes to in-use.
To create an encrypted volume with the AWS Management console, you must select the Encrypted box, and choose the master key you want to use when encrypting the volume. You can choose the default master key for your account, or use AWS KMS to choose any customer master (CMK) that you have previously created.
If you create the volume from a snapshot and do not specify a volume size, the default size is the snapshot size.
The states of a volume are Creating, Deleting, Available, and In-use. A volume in the available state can be attached to an EC2 instance.
3.3.4.3. Attaching an EBS volume
To attach a volume to an EC2 instance, the volume must be in the available state. After the volume is attached, you must connect to the EC2 instance and make the volume available. You can view the attachment information on the volume’s Description tab in the console. The information provides an instance ID and an instance device, which are required to make the volume available on its EC2 instance.
To attach an EBS volume to a running or stopped instance, use the attach-volume command. After you attach an EBS volume to your instance, it is exposed as a block device. You can format the volume with any file system and then mount it. After you make the EBS volume available for use, you can access it in the same ways that you access any other volume. Any data written to this file system is written to the EBS volume and is transparent to applications that use the device.
After connecting to an EC2 instance, the steps to make the volume available for use in Linux are the following:
- List volumes.
$ lsblk
NAME    MAJ:MIN RM  SIZE RO TYPE MOUNTPOINT
xvda    202:0    0    8G  0 disk
-xvda1  202:1    0    8G  0 part /
xvdf    202:80   0   10G  0 disk
- Check that there is no file system on the device.
$ sudo file -s /dev/svdf
/dev/svdf: data
- Create and ext4 (a journaling file system that the Linux kernel commonly uses) file system on the new volume.
$ sudo mkfs -t ext4 /dev/xvdf
mke2fs 1.43.4 (31-Jan-2017)
Creating filesystem with 261888 4k blocks and 65536 inodes
Filesystem UUID: 15d8146f-bcb3-414c-864f-5100bb4b0bf8
Superblock backups stored on blocks:
        32768, 98304, 163840, 229376

Allocating group tables: done
Writing inode tables: done
Creating journal (4096 blocks): done
Writing superblocks and filesystem accounting information: done
- Create a directory for mounting the new volume.
$ sudo mkdir /mnt/data-store
- Mount the new volume.
$ sudo mount /dev/xvdf /mnt/data-store
- Check that the volume is mounted.
$ df -hT
Filesystem              Type    Size  Used Avail Use% Mounted on
/dev/xvdf               ext4    197G   61M  187G   1% /data-store
3.3.4.4. Detaching an EBS volume
You can detach an EBS volume from an EC2 instance explicitly or by terminating the instance. If the instance is running, you must first unmount the volume from the instance. If an EBS volume is the root device of an instance, you must stop the EC2 instance before you can detach the volume.
The command to unmount the /dev/xvdf device on a Linux instance is
sudo umount -d /dev/xvdf
3.3.4.5. Deleting an EBS volume
After volume deletion, the data is physically gone, and the volume cannot be attached to any instance. However, before deletion, it is good practicce to create a snapshot of the volume, which you can use to re-create the volume later if needed. To delete a volume, it must be in the available state (that is, not attached to an instance).
If you want to retain the data on Amazon EBS, then you should disable DeleteOnTermination for the Amazon EBS volume.
3.3.5. Modifying Amazon EBS volumes
You can modify your volumes as the needs of your applications change. You can perform certain dynamic operations on existing volumes with no downtime or negative effects on performance:
- Increase capacity.
- Change the volume type.
- Increase or decrease provisioned IOPS.
You can easily right-size your deployment and adapt to performance changes. Use Amazon CloudWatch with AWS Lambda to automate volume changes to meet the changing needs of your applications, without establishing planning cycles to implement the changes.
In general, you must follow 3 major steps when modifying an EBS volume:
- Use AWS Management console or the AWS CLI to issue
modifyvolume command. - Use AWS Management console or the AWS CLI to monitor the progress of the modification.
- If the size of the volume was modified, extend the volume’s file system to take advantage of the increased storage capacity, by using OS commands for your EC2 instances.
Amazon EBS Update – New Elastic Volumes Change Everything
3.3.5.1. Modify a volume
You can modify volumes that are in the in-use state (attached to an EC2 instance) or the available state (not attaches to an EC2 instance). Minimum and maximum values for size depend on the volume type. For example, for a General Purpose SSD volume, the minimum size is 1 GiB, and the maximum size is 16384 GiB. Though the size of a volume can be changed, it can only be increased, not decreased.
You can change the IOPS value only for the Provisioned IOPS SSD volume type. This setting is the requested number of I/O operations per second that the volume can support. For provisioned IOPS volumes, you can provision up to 50 IOPS per GiB depending on what level of performance your applications require.
3.3.5.2. Monitor the progress
During modifications, you can view the status of the volume in the AWS Management Console. An EBS volume that is being modified moves through a sequence of progress states: Modifying, Optimizing, and Complete. You can resize your file system as soon as the volume enters the Optimizing state. Size changes usually take a few seconds to complete and take effect after a volume is in the Optimizing state. The Optimizing state requires the most time to complete.
3.3.5.3. Extend the file system
To take advantage of the larger EBS volume, you must extend the file system on your local operating system. Use a file system-specific command to resize the file system to the larger size of the volume. These commands work even if the volume to extend is the root volume. For ext2, ext3, and ext4 file systems, the comand is resize2fs. XFS file systems, the command is xfs_growfs.
3.3.6. Securing Amazon EBS
Access to EBS volumes is integrated with AWS IAM. IAM enables access control to your EBS volumes and snapshots. For example, you can use an IAM policy to allow specified EC2 instances to attach and detach volumes. You can also encrypt data that is written to EBS volumes.
3.3.6.1. EBS encryption
Amazon EBS encryption offers a simple encryption solution for EBS volumes without the need for you to build maintain, and secure your own key management infrastructure. When you create an encrypted EBS volume and attach it to a supported instance type, the following types of data are encrypted:
- Data at rest inside the volume.
- All data moving between the volume and the instance.
- All snapshots that were created from the volume.
Encryption is supported by all EBS volume types (General Purpose SSD, Provisioned IOPS SSD, Throughput Optimized HDD, Cold HDD and Magnetic[standard]). You can expect the same IOPS performance on encrypted volumes as you would with unencrypted volumes, with only a minimal effect on latency.
You can access encrypted volumes the same way that you access unencrypted volumes. Encryption and decryption are handled transparently, and they require no additional action from the user, the EC2 instances, or the applications.
EBS encryption uses a customer master key (CMK) from the AWS KMS when creating encrypted volumes. The CMK is also used for any snapshots that are created from the volumes. The first time you create an encrypted volume in a region, a default CMK is created automatically. This key is used for EBS encryption unless you select a CMK that you created separately with AWS KMS.
3.3.6.2. Encrypting a new volume
If you are not using a snapshot to create a volume, you can choose whether to encrypt the volume. Use the default key or select your own custom key. Creating your own CMK gives you more flexibility, including the ability to create, rotate, and disable keys. By using your own CMK, it is easier to define access controls, and to audit the encryption keys that are used to protect your data.
It is a best practice to create your own master key. By creating your own master key, you gain flexibility over the key. For example, you can have one team of users control encryption and another team of users control decryption. You can have separate master keys per application, or per data classification level. You can:
- Define the key rotation policy.
- Enable AWS CloudTrail auditing.
- Control who can use the key.
- Control who can administer the key.
EBS encryption is integrated into the AWS KMS, and AWS KMS is integrated with the IAM console. You have to access IAM console in order to create a key. Configuration options include:
- Adding tags.
- Defining key administrative permissions.
- Defining key usage permissions.
As part of the process for launching a new EC2 instance, you can use custom keys to encrypt EBS volumes at launch time by using the EC2 console or by executing the run-instances command.
3.3.6.3. How EBS encryption works
EBS applies a strategy called envelope encryption that uses a two-tier hierarchy of keys. The customer master key (CMK) is at the top of the hierarchy and encrypts and decrypts data keys that are used outside of AWS KMS to encrypt data. CMKs never leave the AWS KMS.
Each newly created EBS volume is encrypted with a unique 256-bit data key. The CMK is called to wrap the data key with a second layer, or second tier, of encryption. EBS stores the encrypted data key with the volume metadata. Any snapshots created from this volume will also be encrypted with this data key.
When a volume is attached to an EC2 instance, the CMK unlocks the volume data key and stores it in the memory of the server that hosts your instance. When the data key is stored in memory, it can decrypt and encrypt data to and from the volume. If the volume is detached, the data key is purged from memory. The data key is never saved to disk. The data key is stored in memory because:
- If one resource is compromised, exposure is limited. Only one data key is exposed (and not all volumes).
- The encryption key is in the memory of the system doing the encryption, thus limiting any performance degradation. You are not required to bulk-load large amounts of EBS data over the network to encrypt it.
- Small number of master keys are used to protect potentially a large number of data keys.
There is no direct way to encrypt an existing unencrypted volume, or to remove encryption from an encrypted volume. Similarly, you cannot remove encryption from an encrypted snapshot.
However, you can migrate data between encrypted and unencrypted volumes. You can also apply a new encryption status while copying a snapshot. While copying an unencrypted snapshot of an unencrypted volume, you an encrypt the copy. Volumes restored from this encrypted copy are also encrypted.
While copying an encrypted snapshot of an encrypted volume, you can re-encrypt the copy bu using a different CMK. Volumes that are restored from the encrypted copy are accesible only by using the newly applied CMK.
3.3.6.4. Encrypted snapshots
Snapshots that are created from encrypted volumes are automatically encrypted. Volumes that are created from encrypted snapshots are also automatically encrypted. EBS encryption is available only on certain EC2 instance types. You can attach both encrypted and unencrypted volumes to a supported instance type.
The first snapshot copy to another region is generally a full copy. Each subsequent snapshot copy is incremental (which makes the copy process faster), meaning that only the blocks in the snapshot that have changed since your last snapshot copy to the same destination are transferred.
Support for incremental snapshots is specific to a cross-region pair, where a previous complete snapshot copy of the source volume is already available in the destination region. For example, if you copy an unencrypted snapshot from the US East (Ohio) region to the US West (Oregon) region, the first snapshot copy of the volume is a full copy. Subsequent snapshot copies of the same volume transferred between the same regions are incremental.
Similarly, the first encrypted snapshot copied to another region is always a full copy, an each subsequent snapshot copy is incremental. Support for incremental snapshots is specific to a cross-region pair, whereby a previous complete snapshot copy o the source volume is already available in the destination region.
When you copy a snapshot, if the original snapshot was not encrypted, you can choose to encrypt the copy. However, changing the encryption status usually results in a full (not incremental) copy, which may incur greater data transfer an storage charges.
Suppose that an encrypted snapshot is shared with you. It is recommended that you create a copy of the shared snapshot using a different CMK that you control. This protects your access to the volume if the original CMK is compromised, or if the owner revokes the CMK for any reason. You can specify a CMK that is different from the original one, and the resulting copied snapshot uses the new CMK. However, using a custom EBS CMK during a copy operation always results in a full (not incremental) copy, which may incur increased data transfer and storage charges.
By modifying the permissions of the snapshot, you can share your unencrypted snapshots with others in the AWS community by selecting Private and providing a user’s account number. When you share an unencrypted snapshot, you give another account permission to both copy the snapshot and create a volume from it.
You can share an encrypted snapshot with specific AWS accounts, but you cannot make it public. Be aware that sharing the snapshot provides other accounts access to all the data. For others to use the snapshot, you must also share the custome CMK key used to encrypt it. Users with access cna copy your snapshot an create their own EBS volumes based on your snapshot while your original snapshot remains unaffected. Cross-account permissions can be applied to a CMK either when it is created or later.
To create a copy of an encrypted EBS snapshot in another account, complete these 4 steps:
Share the custom key associated with the snapshots with the target account. You can do it from the IAM console:
1.1. Under External Account, click Add and External account.
1.2. Specify which external accounts can use this key to encrypt and decrypt data. Administrators of the specified accounts are responsible for managing the permissions that allow their IAM users and roles to use this key.
Share the encrypted EBS snapshot with the target account.
2.1. Select the snapshot.
2.2. From the actions menu, click Modify Permissions.
From the target account, locate the shared snapshot and create a copy of it.
3.1. Select the shared snapshot.
3.2. Expand the Actions menu.
3.3. Click Copy. To select the master key:
3.3.1. In the Destination Region box, select the target region.
3.3.2. In the Description box, enter a description that is used to easily identify the snapshot.
3.3.3. In the Master Key box, select your master key, and click Copy.
Verify your copy of the snapshot.
3.3.7. EBS performance and monitoring
Many factors can affect the peformance of EBS, including:
- The I/O characteristics of your applications.
- The type and configuration of your EC2 instances.
- The type and configuration of your volumes.
3.3.7.1. EBS performance tips
These tips represent best practices for getting optimal performanace from your EBS volumes in various user scenarios:
- Understand how performance is calculated. Know which units of measure are involved in calculating the performance metrics. For example, kilobytes per second for bandwidth, input/output operations per second (IOPS) for throughput, milliseconds per operation for latency, etc.
- Understand your workload. Know the relationship between the maximum performance of your EBS volumes, the size and number of I/O operations, and the time for each action to complete.
- Use EBS-optimized instances. Network traffic can contend with traffic between your EC2 instance and your EBS volumes. On EBS-optimized instances, the two types of traffic are kept separate.
- Certain factors can degrade HDD performance. For example, when you create a snapshot of a Throughput Optimized HDD (st1) or Cold HDD (sc1) volume, performance can drop to the volume’s baseline value while the snapshot is in progress. Also, driving more throughput than the instance can support can limit performances. Performance also degrades when you initialize volumes that are restored from a snapshot*. Your performance can also be affected if your application does not send enough I/O requests.
- Be aware of performance behavior when initializing volumes from snapshots. You can experience a significant increase in latency when you first access blocks of data on a new EBS volume that was restored from a snapshot. This behavior is a tradeoff since, in this case, EBS volumes were designed for availability over performance. You can avoid this effect on performance by accessing each block beore moving the volume into production.
- Use a modern Linux kernel with support for indirect descriptors. By using indirect descriptors, you can queue more buffers. Indirect descriptors support block devices by making sure that large requests do not exhaust the ring buffer and increase the queue depth. Linux kernel 3.11 and later includes support for indirect descriptors, as do nay current-generation EC2 instances.
- Increase read-ahead for high-throughput, read heavy workloads on Throughput Optimized HDD and Cold HDD volumes. Some read-heavy workloads access the block device through the operating system page cache. To achieve the maximum throughput, configure the read-ahead setting to 1 MiB.
Note
Linux performance tuning.
Some workloads are read-heavy and access he block device through the operating system page cache (for example, from a file system). In this case, to achieve the maximum throughput, the default buffer size for Amazon Linux AMI is 128 KB (256 sectors). AWS recommends that you configure the read-ahead setting to 1 MiB. Apply this per-block-device setting only to your HDD volumes. For example: sudo blockdev -setra 2048 /dev/xvdf
3.3.7.2. Initializing EBS volumes
New EBS volumes receive their maximum performance the moment that they are available and do not require initialization )formerly known as pre-warming). However, storage blocks or volumes that were restored from snapshots must be initialized before you can access the block. Initialization involves pulling down data from S3 and writing it to the EBS volume.
This preliminary action takes time and can cause a significan increase in the latency of an I/O operation the first time each block is accessed. For most applications, amortizing this cost over the lifetime of the volume is acceptable. Performance is restore after the data is accessed once.
You can avoid this performance degradation in a production environment by reading from all of the blocks on your volume before you use it; this process is called initialization. For a new volume created from a snapshot, read all the blocks that have data before using the volume.
3.3.7.3. Deciding when to use RAID
You can join multiple EBS volumes, in a redundant array of independent disks (RAID) 0 stripping configuration to use the available bandwidth for these instances. With RAID 0 striping of multiple volumes, IOPS is distributed among the volumes of a stripe. As a result, you gain faster I/O performance. RAID is a data storage virtualization technology that combines multiple physical disk drive components into a single logical unit for the purposes of data redundancy, performance improvement, or both. Use RAID 0 when:
- Your storage requirement is greater than 16 TB.
- Your throughput requirement is greater than 500 MB/s.
- Your IOPS requirement is greater than 32000 IOPS at 16 K.
Avoid RAID for redundancy because:
- Amazon EBS data is already replicated.
- RAID 1 cuts available EBS bandwidth in half.
- RAID 5 and 6 lose 20% to 30% of usable I/O to parity.
3.3.7.4. Monitoring performance using Amazon CloudWatch
Amazon CloudWatch monitors in real time your AWS resources and the applications that you run. CloudWatch metrics are statistical data that you can use to view, analyze, and set alarms on the operational behavior of your volumes. Types of monitoring data that are available for your Amazon EBS volumes:
- Basic data is available automatically in 5-minute periods. Data for the root device volumes of EBS-backed instances is also provided.
- Detailed data is provided by Provisioned IOPS SSD volumes that automatically send one-minute metrics to CloudWatch.
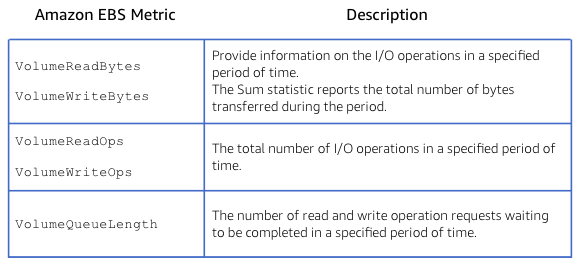
Monitoring the Status of Your Volumes
A number of performance metrics are available for Amazon EBS. The CloudWatch window in the Amazon EC2 console shows some of the graphs that are created from various EBS metrics. For example:
- The Write Bandwith graph shows the sum of the VolumeWriteBytes metric per second. The VolumeWriteBytes metric measures the number of bytes that are written to the volume.
- The Write Throughput graph shows the VolumeWriteOps metric. This metric measures the total number of write operations in a specified period of time.
- The Average Queue Length graph shows the VolumeQueueLength metric. This metric measures the number of read and write operation requests waiting to be completed in a specified period of time.
- The Average Write graph uses the VolumeWriteBytes metric to measure the average size of each write operation during the specified period.
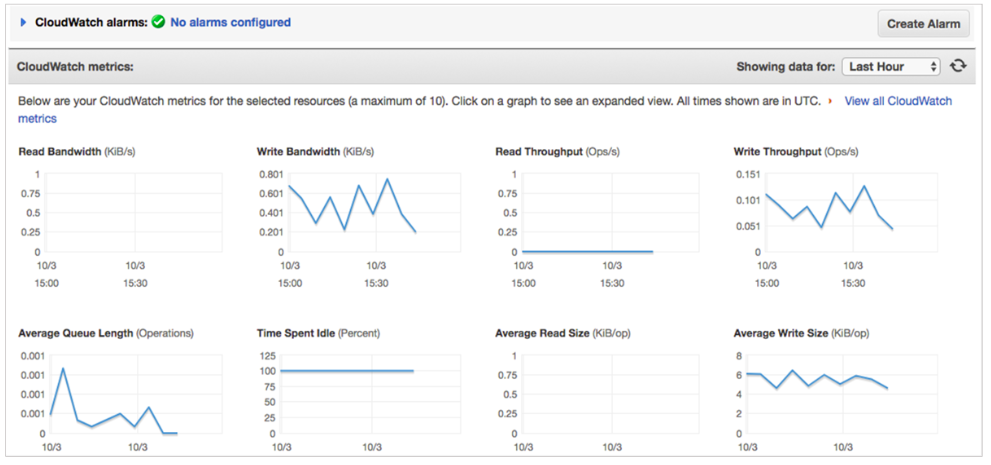
You can retrieve data from CloudWatch by using either the CloudWatch API or the Amazon EC2 console. Use the get-metric-data API to retrieve as many as 100 different metrics in a single request and get-metric-statistics for getting statistics for the specified metric. The console uses the raw data that the CloudWatch API return to display a series of graphs that represent the data. Data is reported to CloudWatch only when the volume is active. If the volume is not attached to an EC2 instance, no data is reported.
Volume status checks are automated tests that run every 5 minutes and return a pass or fail status:
- If all checks pass, the status of the volume is
ok. - If a check fails, the status of the volume is
impaired. - If the status is
insufficient-data, the checks may still be in progress on the volume.
3.3.8. Tracking Amazon EBS usage and costs
3.3.8.1. EBS pricing model
To estimate the cost of using EBS, you need to consider the following:
- Volumes. Volumes storage for all EBS volume types is charged by the amount you provision in GB per month, until you release the storage.
- Provisioned IOPS SSD volumes. The throughput amount billed in a month is based on the average provisioned throughput for the month. Your throughput is measured in MB/s-month, which are added up at the end of the month to generate your monthly charges.
- Snapshots. Snapshot storage is based on the amount of space your data consumes in S3. Because EBS does not save empty blocks, it is likely that the snapshot size is considerably less than your volume size. Copying EBS snapshots is charged based on the volume of data transferred across regions. For the first snapshot of a volume, EBS saves a full copy of your data to S3. For each incremental snapshot, only the changed part of your EBS volume is saved. After the snapshot is copied, standard EBS snapshot charges apply for storage in the destination region.
- Outbound Data transfer is tiered and inbound data is free.
3.3.8.2. Tracking costs using tags
Tagging is an important feature that enables you to better manage your AWS resources. Use tags to assign simple key-value pair to resources, like EC2 instances, EBS volumes, and EBS sanpshots. With tagging, you can logically group resources to help visualize, analyze, and manage resources. By activating user-defined tags for cost allocation, AWS makes the associated cost data for these tags available throughout the billing pipeline.
You can activate tags as cost allocation tags in the Amazon S3 Billing dashboard. By activating cost allocation tags, you can generate reports on cost and usage, broken down by tag values, such as dev, test, or backup. The same dataset that is used to generate AWS Cost and Usage reports is visible in the Cost Explorer for additional visualization. In Cost Explorer, you can view patterns in how much you spend on EBS snapshots. Cost Explorer is enabled from the Billing and Cost Management console in the AWS Management Console.
3.3.9. Amazon EBS important facts
Here is a list of important information about EBS Volumes:
- When you create an EBS volume in an Availability Zone, it is automatically replicated within that zone to prevent data loss due to a failure of any single hardware component.
- An EBS volume can only be attached to one EC2 instance at a time.
- After you create a volume, you can attach it to any EC2 instance in the same Availability Zone.
- An EBS volume is off-instance storage that can persist independently from the life of an instance. You can specify not to terminate the EBS volume when you terminate the EC2 instance during instance creation.
- EBS volumes support live configuration changes while in production which means that you can modify the volume type, volume size, and IOPS capacity without service interruptions.
- Amazon EBS encryption uses 256-bit Advanced Encryption Standard algorithms (AES-256).
- EBS Volumes offer 99.999% SLA.
3.4. Amazon EFS
3.4.1. Overview
Amazon EFS has a simple web service interface that allows you to create and configure file systems quickly and easily. EFS manages all the file storage infrastructure for you which allows tou to avoid the complexity of deploying, patching, and maintaining complex file system deployments. EFS provides simple, scalable file storage for use with Amazon EC2.
EFS file systems store data and metadata across multiple AZs to prevent data loss from the failure of any single component. With EFS, storage capacity is elastic, growing and shrinking automatically as you add or remove files, so your applications have the storage they need, when they need it. Since capacity is elastics, there is no provisioning necessary and you will only be billed for the capacity used.
Choose EFS as a solution for the following scenarios:
- Applications running on EC2 instances that require a file system.
- On-premises file systems that require multi-host attachments.
- High throughput application requirements.
- Applications that require multiple AZs for HA and durability.
It is important to understand your file workload requirements to determine whether EFS is a proper fit for your storage needs.
Amazon FSx provides fully managed third-party file systems. Amazon FSx provides you with the native compatibility of third-party file systems with feature sets for workloads such as Windows-based storage, high-performance computing (HPC), machine learning, and electronic design automation (EDA). You don’t have to worry about managing file servers and storage, as Amazon FSx automates the time-consuming administration tasks such as hardware provisioning, software configuration, patching, and backups. Amazon FSx integrates the file systems with cloud-native AWS services, making them even more useful for a broader set of workloads.
Amazon FSx provides you with two file systems to choose from: Amazon FSx for Windows File Server for Windows-based applications and Amazon FSx for Lustre for compute-intensive workloads.
For Windows-based applications, Amazon FSx provides fully managed Windows file servers with features and performance optimized for “lift-and-shift” business-critical application workloads including home directories (user shares), media workflows, and ERP applications. It is accessible from Windows and Linux instances via the SMB protocol. If you have Linux-based applications, Amazon EFS is a cloud-native fully managed file system that provides simple, scalable, elastic file storage accessible from Linux instances via the NFS protocol.
For compute-intensive and fast processing workloads, like high-performance computing (HPC), machine learning, EDA, and media processing, Amazon FSx for Lustre, provides a file system that’s optimized for performance, with input and output stored on Amazon S3.
Amazon FSx for Lustre provides a high-performance file system optimized for fast processing of workloads such as machine learning, high performance computing (HPC), video processing, financial modeling, and electronic design automation (EDA). These workloads commonly require data to be presented via a fast and scalable file system interface, and typically have data sets stored on long-term data stores like Amazon S3.
Operating high-performance file systems typically require specialized expertise and administrative overhead, requiring you to provision storage servers and tune complex performance parameters. With Amazon FSx, you can launch and run a file system that provides sub-millisecond access to your data and allows you to read and write data at speeds of up to hundreds of gigabytes per second of throughput and millions of IOPS.
Amazon FSx for Lustre works natively with Amazon S3, making it easy for you to process cloud data sets with high-performance file systems. When linked to an S3 bucket, an FSx for Lustre file system transparently presents S3 objects as files and allows you to write results back to S3. You can also use FSx for Lustre as a standalone high-performance file system to burst your workloads from on-premises to the cloud. By copying on-premises data to an FSx for Lustre file system, you can make that data available for fast processing by compute instances running on AWS. With Amazon FSx, you pay for only the resources you use. There are no minimum commitments, upfront hardware or software costs, or additional fees.
3.4.1.1. Use cases
Some common EFS use cases are:
- Web serving. The need for shared file storage for web-serving applications can be challenge when integrating backend applications. Typically, multiple web servers deliver a website’s contant, with each web server needing access to the same set of files.
- Big data analytics. Big data requires storage that can handle large amounts of data while scaling, to keep up with growth, and providing the performance necessary to deliver data to analytics tools. Many analytics workloads interact with data by means of a file interface, rely on file semantics, such as file locks, and require the ability to write to portions of a file. EFS provies the scale and performance required for big data applications that require high throughput to compute nodes coupled with read-after-write consistency and low-latency file operations. EFS can provide storage for organizations taht have many users that need to access and share common datasets.
- Media and entertainment. Digital media and entertainment workflows access data by using nework file protocols, such as NFS. These workflows require flexible, consistent, and secure access to data from off-the-shelf, custom-built, and partner solutions.
- Container storage. Docker containers are ideal for building microservices because they’re quick to provision, easily portable, and provide process isolation. A container that needs access to the original data each time it starts may require a shared file system that it can connect to regardless of which instance they’re running on.
- Database backups. Backing up data by using existing mechanisms, software, and semantics can create a isolated recovery scenario with little locational flexibility for recovery.
- Content management. You an use EFS to create a file system accesible to people across an organization and establish permissions for users and groups ata the file or directory level.
Customers are using EFS for Home directories and software development tools.
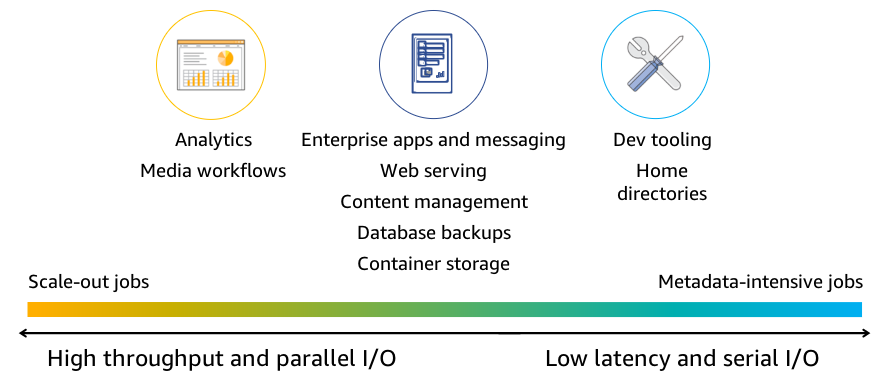
Amazon EFS usage
Amazon Elastic File System - Scalable, Elastic, Cloud-Native File System for Linux
AWS re:Invent 2018: [REPEAT 1] Deep Dive on Amazon Elastic File System (Amazon EFS) (STG301-R1)
3.4.2. Amazon EFS architecture
There are 3 deployment models for NFS storage: On-premises NFS storage, Cloud-based NFS storage in a “do it yourself model”, and Amazon EFS, which is a fully-managed NFS storage service.
An on-premises NFS storage system is designed asking the following questions: “How much storage you need today? How do I ensure that it is sized for the performance needs of my application? What is my expected data growth over the next year, three years, and five years? Do I need to design this system for HA?”. In general, you might not have all the answers to these questions, which can have you speculating on the best approach.
You might also consider building your own NFS storage solution in the cloud through a combination of compute instances (EC2 instances), storage volumes (EBS volumes attached to EC2 instances), and NFS software. The total costs of an NFS setup become expensive to build and manage.
3.4.2.1. EFS architecture
When you choose Amazon EFS, you need to only create mount targets in each AZ where your EC2 instances reside to connect to the Amazon EFS share. Amazon EFS does all the heavy lifting by providing a common DNS namespace in a high durable, scalable, NFS system that your EC2 instances can connect to. EFS supports NFS versions 4.0 and 4.1, so the applications and tools that use this protocols work with EFS. Multiple EC2 instances can access an EFS file system at the same time, providing a common data source for workloads and applications running on more than one instance. EFS charges by gigabyte of data stored and no provisioning of storage is required.
Note
Provisioned Throughput mode.
Provisioned Throughput mode adds a second price dimension. You are charged for the amount of storage you use and the throughtput you provision.
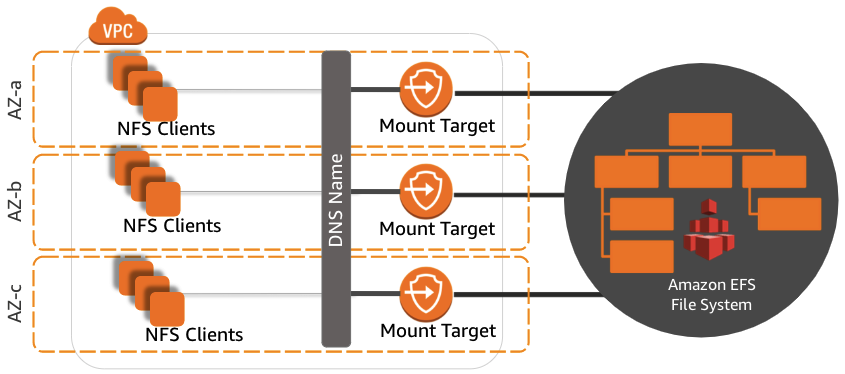
3.4.2.1.1. EFS file system
The EFS file system is the primary resource for EFS where files and directories are stored. EFS provides strong data consistency and file-locking features, so using EFS is just like using any of the popular NFS file systems. EFS is based on aregional construct, so you create an EFS file system in your chosen supported region. For most regions, EFS limits the number of file systems that you can create per account to 125.
When creating your file system, you can choose from 2 performance modes: General Purpose and Max I/O. General Purpose mode is recommended as the best choice for most workloads, and provides the lowest latency for file operations. Consider the Max I/O mode for data-heavy applications that scale out significantly over time.
You can choose from 2 throughput modes: Bursting and Provisioned. Bursting Throughput mode is recommended for most file systems. Use the Provisioned Throughtput mode for applications that require more throughput than allowed by Bursting Throughput.
After you have created your file system, it is instantly accessible from EC2 instances within your VPC and can be accessed by multiple instances simultaneously. Additionally, you can connect to EFS from your on-premises clients by using AWS Direct Connect. After you have mounted your EFS file system, you can control access by using Portable Operating System Interface (POSIX) permissions.
To help you easily identify or organize the multiple file systems you create, you can add tags to your file systems. These are key and value pairs that you create during or after your file system creation. You can create up to 50 tgas per file system.
3.4.2.1.2. Mount target
A mount target is the resource created to enable access to your EFS file system from an EC2 instance or on-premises clients. A single mount target exists in each AZ an is the only way in which you can access your EFS file system. A mount target is analogous to an NFS endpoint. A mount target allows resources that reside in a VPC to access the EFS file system. Mount targets are automatically created during the EFS file system creation process. The mount target has an IP address and a DNS name that you use to mount your EFS file system to your EC2 instances.
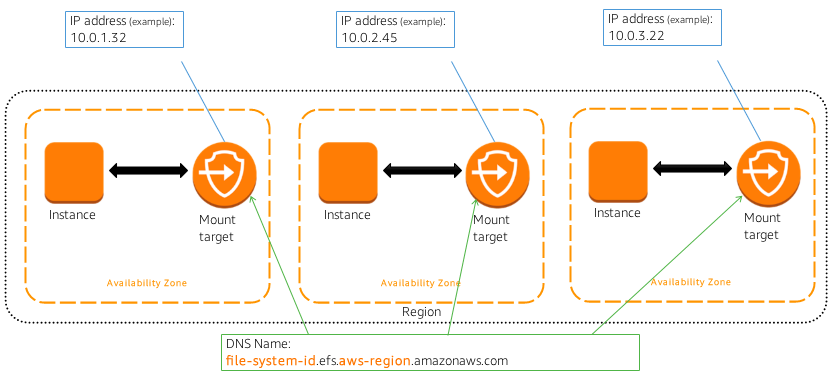
The DNS name contains the file system ID and the AWS Region where the file system was created. By default, mount targets are designed to be highly available. You can also configure access to a mount target by using security groups.
Only one mount target is in each AZ, but if your AZ contains multiple subnets, you can choose which subnet ID to assign to your EFS file system, then mount your Ec2 instances. After this is done, you can create one mount target in each AZ. The mount target obtains an IP address from the subnet dynamically, or you can assign a static IP address. The subnet IP address of the mount target does not change.
3.4.2.2. EFS requirements
Before setting up your file system in EFS, you must take insto account certain requirements:
- You can mount an EFS file system to instances in only one VPC at a time. As you design and configure your applications, remember to keep your instances, which need access to the same file system, in a single VPC.
- Your EFS file system and your VPC must reside in the same region. Because EFS is available only in certain regions, consider the locations where your are deploying resources in AWS.
3.4.2.3. Accessing EFS file systems
You can access EFS file systems in 3 ways: from EC2 instances, from on-premises hosts that mount EFS file systems over AWS Direct Connect, and from hosts running in the VMware Cloud on AWS.
From on-premises hosts, you mount your file systems through mount targets as you would with EC2, but instead of using a DNS name, AWS recommends that you use an IP address in the mount command. If you choose to mount your file system on your on-premises server through AWS Direct Connect with a DNS name, you must integrate your DNS in your VPC with your on-premises DNS domains. Specifically, to forward the DNS requests for EFS mount targets to a DNS server in the VPC over the AWS Direct Connect connection, you must update your on-premises DNS server.

Some of the common uses cases for using AWS Direct Connect are the migration of data, backup/disaster recovery, and bursting. Bursting is copying on-premises data to EFS, analyzing the data at high speed, and sending the data back to the on-premises servers.
3.4.2.4. Amazon EFS File Sync
Amazon EFS File Sync copies existing on-premises or cloud file systems to an EFS file system. Data copy operations are 5 times faster than standard Linux copy tools, and you can set up and manage your copy job easily from the AWS Management Console.
3.4.3. Amazon EFS File System Management
3.4.3.1. Setting up and managing a file system
With EFS, you can set up and manage your file system by using 3 distinct interfaces: the AWS Management Console, AWS CLI and AWS SDK. The process of creating an EFS file system from the AWS Management Console has the following steps:
- Choose the region where you want to create your file system.
- Choose a VPC that has EC2 instances that will connect to your new file system.
- Choose the appropriate subnets for your EFS where your EC2 instances reside.
- Assign a security group for your file system. If you have not created a security group, you can create it later.
- Choose the performance moe for your cloud storage workloads. Choose the throughput mode for your file system.
- You can enable encryption for your file system, if it is needed.
3.4.3.2. Mounting a file system
After creating a file system, you can view details about it in the AWS Management Console, such as its file system ID, performance mode, and throughput mode. The instructions for mounting the file system on an EC2 instance provide steps for installing the EFS mount helper and the NFS client. Steps to mount the file system with either the NFS client or the EFS mount helper are also provided. Each mount command requires the file system ID as an argument.
To mount your EFS files systems, use the EFS mount helper included in the amazon-efs-utils package. It is an open-source collection of Amazon EFS tools and there’s no additional cost to use them. This package includes a mount helper and tooling that make it easier to perform encryption of data in transit for EFS. A mount helper is a program that you use when you mount a specific type of file system.
To mount a file system with the EFS mount helper, follow these steps:
- For an Amazon Linux EC2 isntance, install the Amazon EFS utilities
sudo yum install -y amazon-efs-utils
By default, when using the EFS mount helper with Transport Layer Security (TLS), the mount helper enforces the use of the Online Certificate Status Protocol (OCSP) and certificate hostname checking.
- Create a new directory on your EC2 instance for the mount point, such as
efs.
sudo mkdir efs
- To mount a file system whose ID is
fs-4fad7b36, without encryption using the EFS mount helper:
sudo mount -t efs fs-4fad7b36:/ efs
If you require encryption of data in transit, include the TLS mount option, as shown:
sudo mount -t efs -o tls fs-4fad7b36:/ efs
- With your file system created, you can now mount your file system to your EC2 instances. However, before you can begin the mount process, you must install the NFS client onto the operating system of your EC2 instance and create a directory for the mount point.
sudo mount -t nfs4 -o nfsvers=4.1, rsize=1048576,wsize=1048576,hard,timeo=600,retrans=2 file-system-id.ef.aws-region.amazonaws.com:/ efs
Obtain the file system ID and AWS REgion from the EFS console. The nfsvers parameter sets the protocol version for NFS. In this case, it is NFS protocol 4.1. The rsize``and ``wsize parameters are the I/O parameters for read and write data block size. For EFS, the recommended initial size is 1 MB, which is represented in bytes. The next parameter is the mount type. Hard is the reccommended default value; although soft can be used with some additional considerations for timeo. Timeo is the timeout setting, with 600 deciseconds (one-tenth of a second) as the recommended default value for EFS. If the timeout value is changed from the recommended 60 secondsm set it to a minimum of 15 seconds. The retrans=2 parameter specifies that 2 minor timeouts will occur before a major timeout occurs.
Additionally, you can automatically mount your instance to your EFS file system upon startup. You cando this by using a script or configuring an fstab file when launching and starting your EC2 instance.
Mounting from an Amazon EC2 Instance
Mounting Your Amazon EFS File System Automatically
3.4.4. Securing your data in Amazon EFS
3.4.4.1. Security controls
You can control network traffic to and from file system by using VPC security groups and network access control lists to secure network access to your mount targets. To manage file and directory access, use standard Linux directory and file-level permissions to secure access to your data like any other NFS share. To control administrative access to EFS, use AWS IAM to control who can create, change, and manage EFS file systems. If you require encryption, you an encrypt your data at rest in EFS by integrating with the AWS KMS. You can also encrypt data in transit by enabling TLS when you mount your file system.
3.4.4.2. Security groups
For EFS, you can configure up to 5 security groups per mount target. To obtain access to an NFS mount target in AWS, TCP port 2049 must be open for inbound traffic to the mount target and outbound traffic to clients must be connected to the EFS file system.
3.4.4.3. Amazon EFS POSIX permissions
Amazon EFS supports the standard permission model you use when working with local file systems in Linux or Windows. These permission settings enforce user and group rights at the file and directory level. In a Linux instance, you can use chmod and specify read (r), write (w), execute (x) permissions.
3.4.4.4. Integrating with AWS IAM
Use IAM policies to control access to EFS. AWS IAM has 2 default policies for managin access: AmazonElasticFileSystemFullAccess and AmazonElasticFileSystemReadOnlyAccess. These policies grant full administrative access and read-only access to EFS.
For scenarios in which you want to grant the ability to create new file systems but prohibit the deletion of files systems, create a custom IAM policy for those types of granular permissions. Additionally, you can allow or deny mount target creation and deletion, security group modification, and tag creation.
3.4.4.5. Encryption at rest
If your workload requires encrypting data at rest, EFS integrates with the AWS KMS to provide encryption key management. Choosing the encryption option when you are creating your file system encrypts all data and metadata in your file system. After you have chosen encryption and created the file system, you cannot change these settings.
If you have an existing EFS file system that contains data that you want to encrypt, you must copy that data to a new encrypted EFS file system. You can create encrypt file systems through the AWS Management console, AWS CLI and AWS SDK.
AWS KMS handles the encryption and decryption of files, which makes the process transparent. Data and metadata are encrypted before being written to a disk and decrypted before being accessed by a client. Additionally, because the encryption process is transparent, it does not affect an application’s access to data or metadata, so modifications to your application are not required.
The process of enabling encryption is simple: select the Enable encryption check box and choose your encryption master key. You must select the encryption option when creating the EFS file system.
3.4.4.6. Encrypting data in transit
You can encrypt data in transit for EFS file system by enabling TLS when you mount your file system by using the EFS mount helper. When encryption of data in transit is declared as a mount option for your EFS file system, the mount helper initializaes a client stunnel (ssl-tunnel) process. Stunel is an open source multipurpose network relay. The client stunnel process listens on a local port for inbound traffic, and the mount helper redirects NFS client traffic to this local port. The mount helper uses TLS version 1.2 to communicate with your file system.
3.4.5. Performance and optimization
Amazon EFS is a distributed file system in that it is distributed across an unconstrained number of servers. This configuration enables EFS to avoid bottlenecks and constraints of traditional file servers. Additionally, this distributed design enables a high level of aggregate IOPS and throughput for your applications. Data is also distributed across AZs, which enables the high level of durability and availability that EFS provides. Mount targets are placed in each AZ, and data is distributed across AZs.
3.4.5.1. Performance modes
The default general purpose mode, is suitable for most workloads, general purpose mode provides the lowest latency operations, but has a limit of 7000 operations per second. Mas I/O mode is suitable for workloads that require more than 7000 operations per second, but there are some tradeoff to consider. The increase in operations per second often results in higher latency times for file operations. If a change in performance mode is needed after creation, you must create a new file system, select the correct mode, and then copy your data to the new resource.

Amazon EFS performance modes
3.4.5.2. Throughput in relation to size
With EFS, the throughput performance you can achieve is directly related to the size of the file system. Throughput levels on EFS scale as a file system grows. Because file-based workloads are typically spiky, which drive high levels of throughput for short periods of time and low level of throughput the rest of the time, EFS is designed to burst to high throughtput levels when needed.
All file systems, regardless of size can burst to 100 MiB/s of throughput, and those over 1-TiB large can burst to 100 MiB/s per TiB of data stored in the file system. For example, a 3-TiB file system can burst 300 MiB per second of throughput. The portion of time a file system can burst is determined by its size, and the bursting model is designed so that typical file system workloads will be able to burst when needed.
EFS uses a credit system to determine when file systems can burst. Each file system earns credits over time ata a baseline rate that is determined by the size of the file system, and uses credits whenever it reads or writes data. If you find that you need more throughput than EFS is providing based on your data size, you can enable Provisioned Throughput mode to provide additional throughput to support your application requirements.
3.4.5.3. Throughput modes
The throughput mode of the file system helps determine the overall throughput a file system is able to achieve. You can select the throughput mode at any time (subject to daily limits). Changing the throughput mode is a non-disruptive operation and can be run while clients continuously access the file system. You can choose between 2 throughput modes: Bursting or Provisioned.
Bursting Throughput is the default mode and is recommended for a majority of uses cases and workloads. Throughput scales as your file system grows, and you are billed for only the amount of data stored on the file system in GB-Month. Because file (based workloads are typically spiky-driving high levels of throughput for short periods of time and low level of throughput the rest of the time) using Bursting Throughtput mode allow for high throughput levels for a limited period of time.
You can monitor and alert on your file system’s burst credit balance by using the BurstCreditBalance file system metric in Amazon CloudWatch. File systems earn burst credits at the baseline throughput rate of 50 MiB/s per TiB of data stored and can accumulate burst credits up to the maximum size of 2.1 TiB per TiB of data stored. A newly created file systems begin with an initial credit balance of 2.1 TiB. As a result, larget file systems can accumulate and store more burst credits, which allows them to burst to longer periods.
Provisioned Throughput is available for applications that require a higher throughput to storage ratio thatn those allowed by the Bursting Throughput moe. In this mode, you can provision the file system’s throughput independent of the amount of data stored in the file system. Provisioned Throughput allows you to optimize your file system’s throughput performance to match your application’s needs, and your application can drive up to the provisioned throughput continuously.
When file systems are running in Provisioned Throughput mode, you are billed for the storage you use in GB-Month and for the throughput provisioned in MiB/s-Month. The storage charge for both Bursting and Provisioned Throughput modes includes throughput of the file system in the price storage.
You can increase Provisioned Throughput as often as you need. You can decrease Provisioned Throughput or switch throughput modes as long as it’s been more then 24 hours since the last decrease or throughput mode change.

Amazon EFS throughput modes
Whitepaper: Choosing Between the Different Throughput & Performance Modes
3.4.5.4. Maximizing Amazon EFS throughput
3.4.5.4.1. Parallelizing file operations
When looking at your workload, consider the type of Amazon EC2 instance that is connecting to your file system. Review the virtual CPU, memory, and the network performance capabilities before deciding on Amazon EFS. These attributes determine the performance level of applications that use EFS.
To achieve higher throughput levels, EFS takes advantage of parallelizing your operations owing to EFS’ distributed architecture. Parallelization means using more instances and more threads per instance. If your application can use multiple threads to perform file operations, you can take advantage of parallelization to increase performance.
An effective use case could be a data migration or large file copy operation that use multiple threads to shorten the time frame of the data move.
3.4.5.4.2. I/O size - serial operations
The I/O size impact throughput for EFS is when performing serialized operations. As the amount of data you are reading or writing in an operation increases, the throughput increases as well. This is because of the distributed storage design of Amazon EFS.
This distributed architecture results in a small latency overhead for each file operation. As the result of this per-operation latency, overall throughput generally increases as the average I/O size increases because the overhead is amortized over a larger amount of data.
Testing your workloads and understanding how your application is reading or writing data help you determine which applications are eligible for high throuhput data transfers with EFS.
3.4.5.5. Amazon EFS CloudWatch metrics
Performance metrics are displayed for each file system created. CloudWatch captures the following metrics:
BurstCreditBalancedetermines the number of burst credits you have available.ClientConnectionsdisplays the number of client connections to a file system. When using a standard clien, there is 1 connection per mounted EC2 instance.DataReadIOBytesis the number of bytes for each file system read operation.DataWriteIOBytesis the number of bytes for each file system write operation.MetaDataIOBytesis the number of bytes for each metadata operation.PercentIOLimitis an important metric to look at when using the General Purpose mode. This metric is available only on the General Purpose mode and helps you determine whether you are reaching the limits of this mode, and if you need to switch to the Max I/O mode.PermittedThroughputshows the amount of throughput the file system is allowed. For file systems in the Provisioned Throughput mode, this value is the same as the provisioned throughput. For the file systems in the Bursting Throughput mode, this value is a function of the file system size andBurstCreditBalance.TotalIOBytesis the number of bytes for each file system operation, including data read, data write, and metadata operations.
The 2 most important metrics for CloudWatch monitoring are PercentIOLimit and BurstCreditBalance. PercentIOLimit because you will use this metric for determining when to use the General Purpose mode or Max I/O mode. BurstCreditBalance because it can show you how youa are using the available burst credits you have and how often you are using burst capacity. File systems by nature are spiky and will most likely use some bursting, but if a performance issue surfaces, you must also determine how often you might be draining you burst credits.
Metric math enables you to query multiple CloudWatch metrics and use math expressions to create a new time series based on these metrics. You can visualize the resulting time series in the CloudWatch console and add them to dashboards.
3.4.5.6. Best practices using Amazon EFS
In summary, here are some key recommendations to consider when using Amazon EFS:
- Before moving your applications to EFS, set up test environments in AWS to understand how your applications behaves while using EFS. In your test environment, you can obtain data on performance levels, throughput levels, and latency before deciding on EFS. The General Purpose setting is suitable for the majority of most workloads and provides the lowest latency.
- Start testing with Bursting Throughput. It is the recommended throughput mode for most file systems.
- For optimal performance and to avoid a variety of known NFS client defects, work with a recent Linux kernel, version 4.0 or later.
- To mount your EFS file system on your EC2 instance, use the EFS mount helper. You can use NFS version 4.1 when creating your file system mount points to ensure optimum compatibility. EFS supports NFS versions 4.0 and 4.1 protocols when mounting your file systems on EC2 instances. However, NFS v4.1 provides better performance.
- Improve EFS performance by aggregating I/O operations, parallelizing, and managing burst credits. Check your burst credit earn/spend rate when testing to ensure a sufficient amount of storage.
- Where possible, leverage the use of multiple threads, EC2 instances, and directories.
- Monitor EFS metrics with CloudWatch to maintain the reliability, availability, and performance of EFS.
3.4.6. Amazon EFS cost and billing
3.4.6.1. EFS pricing model
Generally, Amazon EFS pricing varies by region. With EFS, you have 3 pricing dimensions:
- Storage: amount of file system storage you use per month.
- Throughput. In the default Bursting Throughput mode, no charges are incurred for bandwidth or requests, and you get a baseline rate of 50 KB/s per GB of throughput included with the price of storage. You can choose the Provisioned Throughput mode and provision the throughput of your file system independent of the amount of data stored and pay separately for storage and throughput. Like the default Bursting Throughput mode, the Provisioned Throughput mode also includes 50 KB/s per GB (or 1 MB/s per 20 GB) of throughput in the price of storage. You are billed only for the throughput provisiones above what you are provided based on data you have stored. When using the Provisioned Throughput mode, you pay for the throughput you provision per month. No minimum fee and no setup charges are incurred.
- EFS File Sync. You pay per-GB for data copied to EFS. You can use CloudWatch to track the amount of data synced with another file system, whether it’s on the AWS Cloud or on premises. If your source file system is in AWS, you are billed at standard EC2 rates fpr the instance on which the EFS File Sync agent runs.
3.4.6.2. Amazon EFS versus DIY file storage
EFS pricing is based on paying for what you use. If Provisioned Throughput mode is enabled, there are no minimum commitments or upfront fees, and you are charged per GB stored and throughput consumed. You are not required to provision storage in advance, and you do not incur additional charges or billing dimensions when using EFS. With do-it-yourself file storage configurations, you must consider many costs, such as EC2 instance costs, EBS volume costs, and Inter-Availability Zone transfer costs.
3.5. Amazon storage comparison

Amazon storage comparison
3.6. AWS Storage Gateway
All data transferred between any type of gateway appliance and AWS storage is encrypted using SSL. By default, all data stored by AWS Storage Gateway in S3 is encrypted server-side with Amazon S3-Managed Encryption Keys (SSE-S3). Also, when using the file gateway, you can optionally configure each file share to have your objects encrypted with AWS KMS-Managed Keys using SSE-KMS.
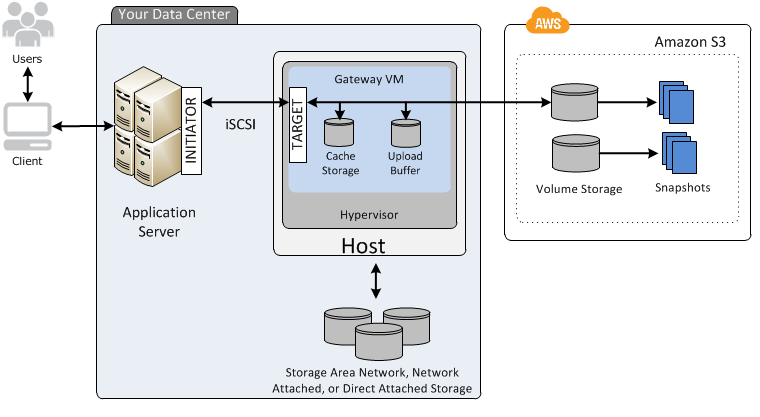
AWS Storage Gateway
Volume gateway provides an iSCSI target, which enables you to create block storage volumes and mount them as iSCSI devices from your on-premises or EC2 application servers. The volume gateway runs in either a cached or stored mode.
- In the cached mode, your primary data is written to S3, while retaining your frequently accessed data locally in a cache for low-latency access.
- In the stored mode, your primary data is stored locally and your entire dataset is available for low-latency access while asynchronously backed up to AWS.
In either mode, you can take point-in-time snapshots of your volumes, which are stored as Amazon EBS Snapshots in AWS, enabling you to make space-efficient versioned copies of your volumes for data protection, recovery, migration and various other copy data needs.
By using cached volumes, you can use Amazon S3 as your primary data storage, while retaining frequently accessed data locally in your storage gateway. Cached volumes minimize the need to scale your on-premises storage infrastructure, while still providing your applications with low-latency access to frequently accessed data. You can create storage volumes up to 32 TiB in size and afterwards, attach these volumes as iSCSI devices to your on-premises application servers. When you write to these volumes, your gateway stores the data in Amazon S3. It retains the recently read data in your on-premises storage gateway’s cache and uploads buffer storage.
Cached volumes can range from 1 GiB to 32 TiB in size and must be rounded to the nearest GiB. Each gateway configured for cached volumes can support up to 32 volumes for a total maximum storage volume of 1,024 TiB (1 PiB).
In the cached volumes solution, AWS Storage Gateway stores all your on-premises application data in a storage volume in Amazon S3.